Magento Cloud – How to apply a patch to make corrections in the project

Nowadays, installing third-party packages through composer is a very common practice in any project. The code installed by composer is a public version of code from the Internet, which means that it cannot be arbitrarily modified.

In practice, it is inevitable that developers will encounter bugs in third-party packages, where no corrections have been released yet. By design, developers cannot directly modify the code downloaded from composer, because every time the composer is updated and installed the code will be overwritten by the public version again. In response to such correction requirements, Magento Cloud has designed patch mechanisms during and after the deployment process.

To apply a patch, developers need to create a patch file. Supposing that we want to add a line of comment as follows to the file vendor/magento/framework/Phrase.php:

First, create a copy of the file to be modified, in this case: vendor/magento/framework/Phrase-fix.phpvendor/magento/framework/Phrase.php to and copy it in the same root location as follows: vendor/magento/framework/Phrase-fix.phpvendor/magento/framework/Phrase-fix.php.

After modification, the following commands need to be executed in the project root directory as a root:

diff -rupN vendor/magento/framework/Phrase.php vendor/magento/framework/Phrase-fix.php > demo.patch

This command compares the original file Phrase.php with the new file Phrase-fix.php and generates a demo.patch file with the differences between them.

Then, open the demo.patch file for making adjustments:

First, add the git diff information and modify it to the original file change:

diff –git a/vendor/magento/framework/Phrase.php b/vendor/magento/framework/Phrase.php

index 3ee2rd7..8349152 111644

The index is a git hash, but it can be given arbitrarily since vendor files are usually listed in .gitignore.

Adjust the file path as follows:

— A/vendor/magento/framework/Phrase.php 2021-04-14 23:05:30.077087570 +0800

+++ b/vendor/magento/framework/Phrase.php 2021-04-14 23:05:22.469044185 +0800

At the end the adjusted patch file content would like as follows:

After this, the file patch can be placed into the m2-hotfixes folder in the cloud root project, if there is no such folder, it needs to be created.

The last step is to push the changes to the environment. After the deployment is completed, the patch should be applied successfully.

First, check the contents of the target file:

As expected, the changes have been added. In addition, Magento Cloud also provides tools to view the patch status by executing the following command:

php ./vendor/bin/ece-patches status

The patch file just uploaded will appear in the list, and it shows that it has been executed.

Besides this patch, there are many unexecuted patches on the list. These are some optional official patch files released by Magento. They are also easy to apply. For example, for applying MDVA-12304 and MDVA-30972 they need to be added in the .magento.env.yaml file as follows:

stage:

   build:

     QUALITY_PATCHES:

       – MDVA-12304

       – MDVA-30972

Then, commit the changes and push them to the environment for applying them. After redeploying the same command can be executed for confirmation: 

php ./vendor/bin/ece-patches status

After confirmation, the environment can continue working as usual; however, it is recommended to apply patches only if the regular Magento customization options (preferences, plugins, etc) are not convenient for the specific code and/or the 3rd vendor module provider has not provided any code update via composer.
Fixing .gitignore not working in git

Every time a developer requires to exclude/ignore files and/or folders, in a certain git repository, the .gitignore file becomes handy. However, sometimes git will not exclude files/folders added in .gitignore. The reason is that those resources had been committed before, without being noticed by the developer. In the following example, a new file test.xml has been added, so after executing git status the display will look like this.

Fixing this issue is quite simple by simple using the CLI, just as follows:

  1. Update .gitignore by adding the folder/files to be ignored, in this example test.xml will be added.
  1. Add changes and commit

git add .

git commit -m “Modified .gitignore file”

  1. Execute the following command to clear git cache for the whole repository

git rm -r –cached .

  1. After this, when executing the git status command git will not display test.xml as an untracked file.

From this point, every change to the text.xml will be excluded/ignored.

Changing Magento Cloud PHP version

Technology hardware and software are upgrading constantly, mostly in order to provide a better service and/or improve security, in the middle of this constant changing the PHP scripting language needs to cope with all these dynamic environments. 

Magento Cloud also facilitates changing the PHP version; providing more convenience to any DevOps team. 

When upgrading the PHP version, its version needs to be compatible with the Magento host version. The following table can be referenced for helping to determine the correct PHP version.

Adobe Commerce versionPHP version
2.3.57.2, 7.3
2.3.67.3
2.3.77.3, 7.4
2.4.07.3, 7.4
2.4.17.4
2.4.27.4
2.4.37.4
2.4.48.1
2.4.58.1

For changing the PHP version, the file .magento.app.yaml must be edited. For example:

Original service definition:

type: php:7.2

Updated service definition:

type: php:7.3

Commit the changes and push the changes for activating a redeploy:

git add –all

git commit -m “Changed PHP version”

git push <remote> <branch>

After redeploying open a tunnel via Magento CLI:

mgc tunnel:open

mgc tunnel:info

And check the service version for confirming the upgrade by SSH into the environment and check the PHP version:

php -v

After confirmation, the environment can be used as normal.

Images not loading in Magento Cloud Due to Cache Issue

By design, when the site administrator uploads a new product image, Magento will autogenerate all the image sizes and required cache folders inside the pub/media folder. After this, every time the frontend browses those images Magento will serve those cache folders, aiming for faster browsing times.

Magento Cloud architecture allows extra settings for handling those image cache folders; including the minimum persistence time on the cloud.

The .magento.app.yaml file, besides allowing to configure the PHP version, extensions, and relationships, also allows configuring how long the cache folder must persist in the cloud. Let’s consider the following example where the cache folder is being configured to be stored for at least 1 year.

“/media”:

            root: “pub/media”

         …

            expires: 1y

    …

This will assure that the cache folder will not lose any data for at least 1 year; however if after one year the environment is redeployed, it is possible that the images will not be displayed and the browse console will display a 404 error when attempting to load any product image.

For solving this issue and also, for renewing the cache folder for another year, the cache needs to be regenerated by accessing the environment via SSH and executing the following command:

php bin/magento catalog:images:resize

This command will regenerate all necessary images sizes and their corresponding cache resource inside pub/media. Also, after this, it is recommended to re-index and clean the cache.

php bin/magento indexer:reindex 

php bin/magento cache:flush

After this, all product images will be displayed normally.

Downgrading Magento Cloud Services Versions

Magento Commerce Cloud allows a service downgrade for any particular environment; the downgrade process is not as direct as upgrading, but it is still very convenient.

When downgrading a service, its version needs to be compatible with the Magento host version. The following table can be referenced for helping to determine the correct service version.

ServiceAdobe Commerce 2.4.xAdobe Commerce 2.3.5 ~2.3.9
elasticsearch7.7, 7.96.8, 7.5, 7.7, 7.9
mysql/mariadb10.2, 10.410.1 ~10.3
rabbitmq3.83.7, 3.8
redis5.x, 6.x5.x, 6.x

The easiest way for downgrading a service is by renaming it or creating a new one in the magento/services.yaml file. For example:

Original service definition:

elasticsearch:

    type: elasticsearch:7.7

    disk: 1024

Updated service definition:

elasticsearch2:

    type: elasticsearch:6.8

    disk: 1024

After that, the services relationship must be updated in the .app.magento.yaml file. For example:

Original service relation:

relationships:

    database: “mysql:mysql”

    redis: “redis:redis”

    elasticsearch: “elasticsearch:elasticsearch”

    rabbitmq: “rabbitmq:rabbitmq”

Updated service relation:

relationships:

    database: “mysql:mysql”

    redis: “redis:redis”

    elasticsearch: “elasticsearch2:elasticsearch”

    rabbitmq: “rabbitmq:rabbitmq”

Commit the changes and push the changes for activating a redeploy:

git add –all

git commit -m “Downgraded elasticsearch service”

git push <remote> <branch>

After redeploying open a tunnel via Magento CLI:

mgc tunnel:open

mgc tunnel:info

And check the service version for confirming the upgrade:

elasticsearch2:

    –

        username: null

        …

        type: ‘elasticsearch:7.7’

       …

After confirmation, the environment can be used as normal.

Upgrading Magento Cloud Services Versions

As part of its solution, Magento Cloud facilitates changing the services for any particular environment; reducing also the risks of causing a conflict within components.

When upgrading a service, its version needs to be compatible with the Magento host version. The following table can be referenced for helping to determine the correct service version.

ServiceAdobe Commerce 2.4.xAdobe Commerce 2.3.5 ~2.3.9
elasticsearch7.7, 7.96.8, 7.5, 7.7, 7.9
mysql/mariadb10.2, 10.410.1 ~10.3
rabbitmq3.83.7, 3.8
redis5.x, 6.x5.x, 6.x

For instance, for Magento 2.3.7, a valid selection would be as follows:

  • elasticsearch:7.7
  • mysql/mariadb:10.2
  • rabbitmq:3.8
  • redis:5.0

For changing a service version, the file .magento/services.yaml must be edited. For example:

Original service definition:

elasticsearch:

    type: elasticsearch:6.0

    disk: 1024

Updated service definition:

elasticsearch:

    type: elasticsearch:7.7

    disk: 1024

Commit the changes and push the changes for activating a redeploy:

git add –all

git commit -m “Upgraded elasticsearch service”

git push <remote> <branch>

After redeploying open a tunnel via Magento CLI:

mgc tunnel:open

mgc tunnel:info

And check the service version for confirming the upgrade:

elasticsearch:

    –

        username: null

        …

        type: ‘elasticsearch:7.7’

       …

After confirmation, the environment can be used as normal.

Upgrade Shopify APP from EASDK to Shopify App Bridge 2

Shopify App Bridge 2 is the latest SDK for any custom APP uploaded to Shopify. In the past, EASDK was one of the most popular SDK used by developers for utilizing the Shopify platform; however, this one is not supported anymore by the Shopify platform, leading to all apps using EASDK to be deleted in the near future. For this reason, Shopify is urging all partners developers to upgrade to Shopify App Bridge 2.

The upgrading process requires a function substitution at the App’s Javascript level, luckily Shopify documentation documentation is very complete on how to achieve this task.

Upgrade basics

The first step is to find the javascript import for the old EASDK and replace it with the new Shopify App Bridge script.

Original

<script src=”https://cdn.shopify.com/s/assets/external/app.js“></script>

New

<script src=”https://unpkg.com/@shopify/app-bridge@2“></script>

Referencing to app-bridge@2 will let the APP use the latest Shopify App Bridge 2, however, if another version is required it can be changed to something like [email protected]

The second step is to replace the EASDK init function for the new createApp function

Original

ShopifyApp.init ({

apiKey: “<? php echo $ this-> config-> item (‘shopify_api_key’);?>”,

shopOrigin: “https: //” + current_shop,

debug: true,

forceRedirect: true

});

New

var AppBridge = window [‘app-bridge’];

var createApp = AppBridge.default;

var app = createApp ({

apiKey: “<? php echo $ this-> config-> item (‘shopify_api_key’);?>”,

shop: current_shop,

shopOrigin: current_shop,

});

Finally, the following steps is to find for any call to ShopifyApi to the equivalence in Shopify App Bridge 2, for example, the process for replacing a Toast would be as follows:

Original

ShopifyApp.flashError(‘Error’);

New

var AppBridge = window [‘app-bridge’];

var actions = AppBridge.actions;

var Toast = actions.Toast;

const toastOptions = {

message: ‘Error ‘,

duration: 5000,

isError: true,

};

const toastNotice = Toast.create (app, toastOptions);

toastNotice.dispatch (Toast.Action.SHOW);

A complete reference on how to substitute the old EADK functions can be found in the official Shopify documentation. 

https://shopify.dev/apps/tools/embedded-app-sdk/methods

Finally, after upgrading to Shopify App Bridge 2, please remember to update to the latest Shopify API version and test for discarding any unexpected issue after the upgrading. 

Using CSS on Magento Page Builder

Page Builder is Magento’s tool functionality for providing merchants a convenient way for designing pages ready for production; furthermore, allows faster releasing times and a cost reduction related to web development. 

Originally provided in the Magento Commerce / Enterprise version only, it is now also available in Magento Open Source, starting from version 2.4.3.  Page Builder provides a very intuitive drag and drop interface that also allows setting those little details that make a website stand out from the rest; being CSS one of them.

Adding a customized CSS style on any Page Builder element is as simple as adding a new HTML code element in the page.

Then, by editing the html code block, any custom class CSS style definition can be defined, just like in any regular html file.

After saving, the custom CSS class can be used in any other Page Builder block by just adding it into Advanced properties of any block setting

After saving again, the CSS class will be applied to any block that is referencing the custom CSS class.

However, in some special cases, a deeper knowledge of Magento theme development would be required for a whole customization of self-generated elements, but the general website development process experience will definitely be improved.

HTTP Basic Authentication for Magento Cloud

There is no doubt that live testing is much preferred before pushing to the Production environment, however, there are times when a new feature or changes on Integration/ Staging environment is preferred to be kept private or secret from the public network; for this, HTTP authentication would be a solution.

What is HTTP Basic Authentication?

The basic flow of any HTTP Basic Authentication is as follows:

  1. A client requests access to any page from the store.
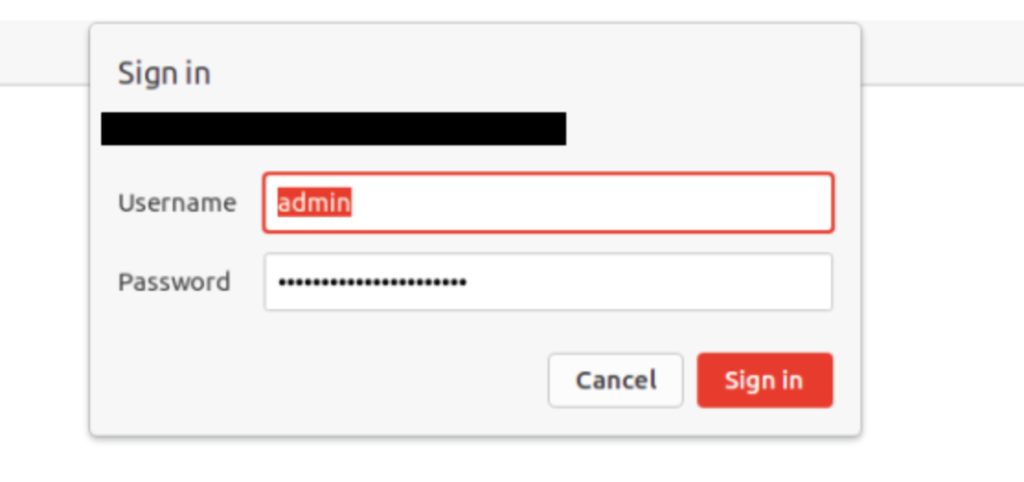
  2. The web server returns a dialog box that requests username and password.
  3. The client submits the username and password to the server.
  4. The server authenticates the user,if successful, returns the requested page.

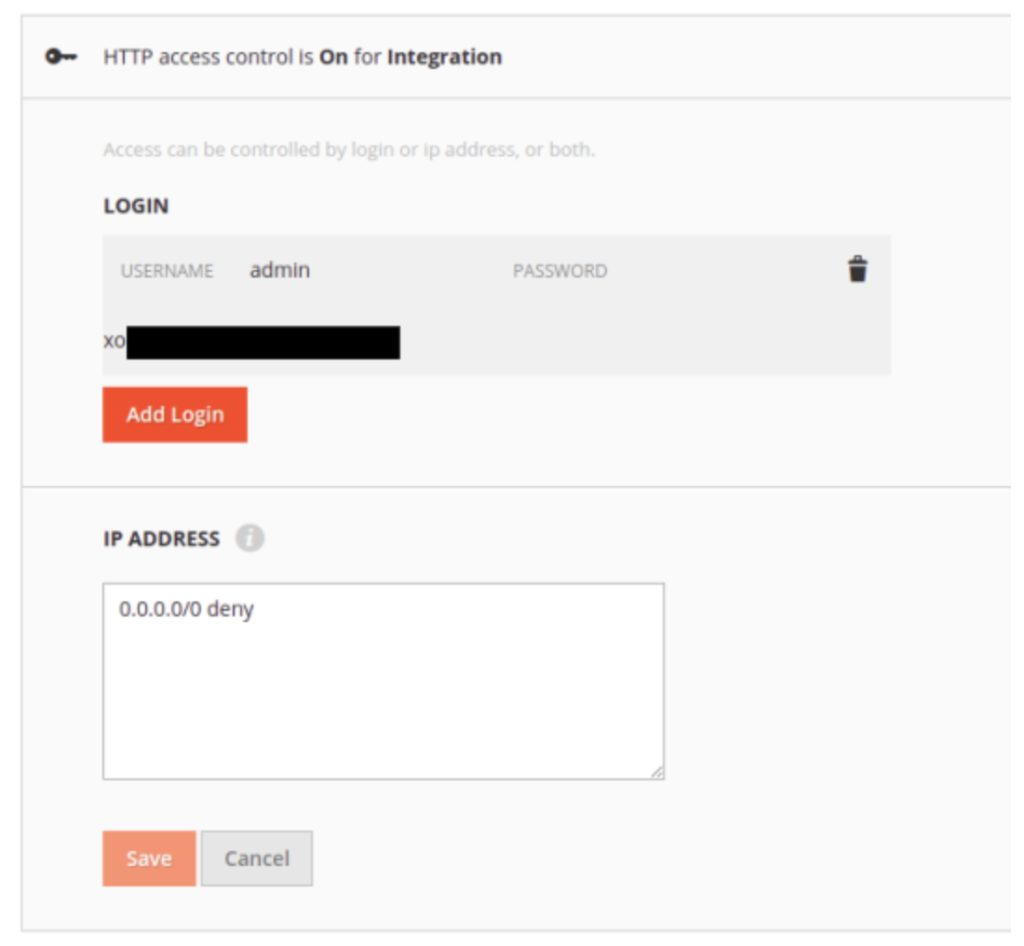
Magento Cloud provides a very simple web interface for enabling HTTP authentication; just click on the environment and go to Configure EnvironmentSettings; then click Edit on HTTP access control.

The interface will look like the following:

By using the above interface the administrator can set any amount of usernames and passwords, and/or restrict or allow by IP address.

After finishing setting up the administrator must switch HTTP access control to ON in order to apply the changes, this will display a login dialog if the client has not been authenticated yet.

This will add an extra security layer to those teams that require to live test under a certain degree of discretion, being also secured since Magento Cloud utilizes SSL as default for all communication.

Setting Up Magento PWA Venia to Production Mode

After developing or testing new features, for any particular Venia environment on developer mode, the next step is to deploy to production mode in order to take full advantage  of the customized and enhanced code for being used as a Magento frontend.

This article will not cover any CI/CD process, due to its dependency and dynamic nature based on custom requirements and testing.

  1. Installing Venia 

1.1 Before Installation

Need to check both Node and Yarn versions on the host; being the following version the minimum required. 

node -v (Should be 10.16.3 or higher)

yarn -v (Should be 1.13.0 or higher)

If the host’s versions are lower, an update or reinstall is required. 

For more information regarding specific OS installation steps can be found in the following links:

https://nodejs.org/en/
https://yarnpkg.com/getting-started/install

1.2 Installation

  1. In the local folder to be used as the root directory, create the initial project and answer the questions:

# yarn create @magento/pwa

  1. Start the dev server:

# yarn watch @magento/pwa

After this, the dev server will be ready to be used; however, it is recommended to create a custom hostname and SSL cert, especially if there are more than one environment being developed in the same local environment.

# yarn build create-custom-origin ./

After this, everytime the dev server starts will use a unique and customized hostname and SSL certificate.

If the dev requires a very specific hostname it can be changed in the .env file by setting changing the value for CUSTOM_ORIGIN_EXACT_DOMAIN

Note: everytime the hostname is modified the create-custom-origin command must be executed.

  1. Running Production Mode

After testing and developing all the required features, the Venia can be set now to production mode as follows:

1. Setting up .env params

The following params in the .env file need to be set up in order to run production mode properly. 

STAGING_SERVER_PORT=xxxx —> for customizing the port number

CUSTOM_ORIGIN_EXACT_DOMAIN=”xxxxx” → for customizing the hostname

2. Compilation

Before running production mode, the code needs to be compiled into the build folder.

# yarn run build

3.3 Running

Finally, the production mode can start.

# yarn start

  1. Setting up NGINX

It is also recommended to deploy a Web server for enhancing security and performance. 

Usually, ReactJs-based projects work better with NGINX. The following checklist needs to be followed:

  1. Static vs Proxy mode: Should NGINX be set as static or proxy mode? This depends on if NGINX will handle the whole request or just serve as a bridge for another software.
  1. Firewall Settings: Make sure that all ports configured for both Venia and NGINX are able to be accessed securely from any secure client.
  1. SSLCertificate: By default Venia requires to work with https
  1. URL rewrite may be necessary or not; depending on the NGINX and Server configuration.

For a full reference on how to comply with the checklist listed above, please refer to the following links. The NGINX configuration is relative to the OS and for these reasons they will not be covered in this article.

NGINX References:

https://blog.devgenius.io/using-nginx-to-serve-react-application-static-vs-proxy-69b85f368e6c