Importing products into Magento with a .csv file can be an incredibly time consuming and sometimes frustrating experience. One can be faced with one hundred columns of product attributes, only some of which seem to match up with the product information that you have on hand. However, uploading via .csv is the best option for uploading multiple products in one batch, and can be made a little easier by following a process and having a little understanding of how to match the cryptic information seen on a magento excel sheet with what you’re seeing or want to see on the front end of your website.
Mandatory Attributes:
When you’re uploading products to Magento, not every variable that is listed in your exported template is necessary to fill out (or include at all). However, in order to successfully upload a .csv, you’ll need to include the mandatory attributes. These include attributes that are, by default, mandatory for any Magento product, as well as attributes that are mandatory to your site exclusively, according to its design and specific needs. If you are only uploading the minimum mandatory fields for products that don’t yet exist, you will need to upload further further information before the products are live.
Magento’s mandatory attributes are:
sku
_attribute_set
_type
price
name
status
visibility
description
tax_class_id
short_description
weight
These attributes are listed in their “attribute code” form as they will appear on a spreadsheet for Magento. Even if some of these field have been altered by site developers, the majority will be mandatory on any Magento site:
sku – your products’ unique alphanumeric identifier.
_attribute_set – refers to a default attribute set that each type of product has. for example “shoes” _attribute_set would likely include a single number representing shoe size and color attribute, whereas “pants” _attribute_set would automatically include a number for both waist and inseam as well as color. _attribute_set defines the attributes that apply to categories of products.
Attribute sets will be defined by the sites developers, so they will vary from site to site, and it’s best to speak with the person who set them up in order to get a good grasp of what they are on your site.
_type – refers to whether your product is simple or configurable. In other words whether it is a stand alone product, a variation, or the parent of variations
price – Self explanatory, the price of the products
name – The title of your product
status – whether or not the product is active on the website. Shown in the back end product page as “Enabled” or “Disabled,” and represented in a .csv by a 1 (enabled) or 2 (disabled)
visibility – Refers to visibility of product on site: Search and Catalog. Most simple products that belong to a parent configurable will not be visible individually. Represented numerically in a .csv.
description – Self explanatory, this is a text field for you to enter a product description. Where this appears on the front end of your site depends on its design.
Note- this field can be changed to non-mandatory by site developers
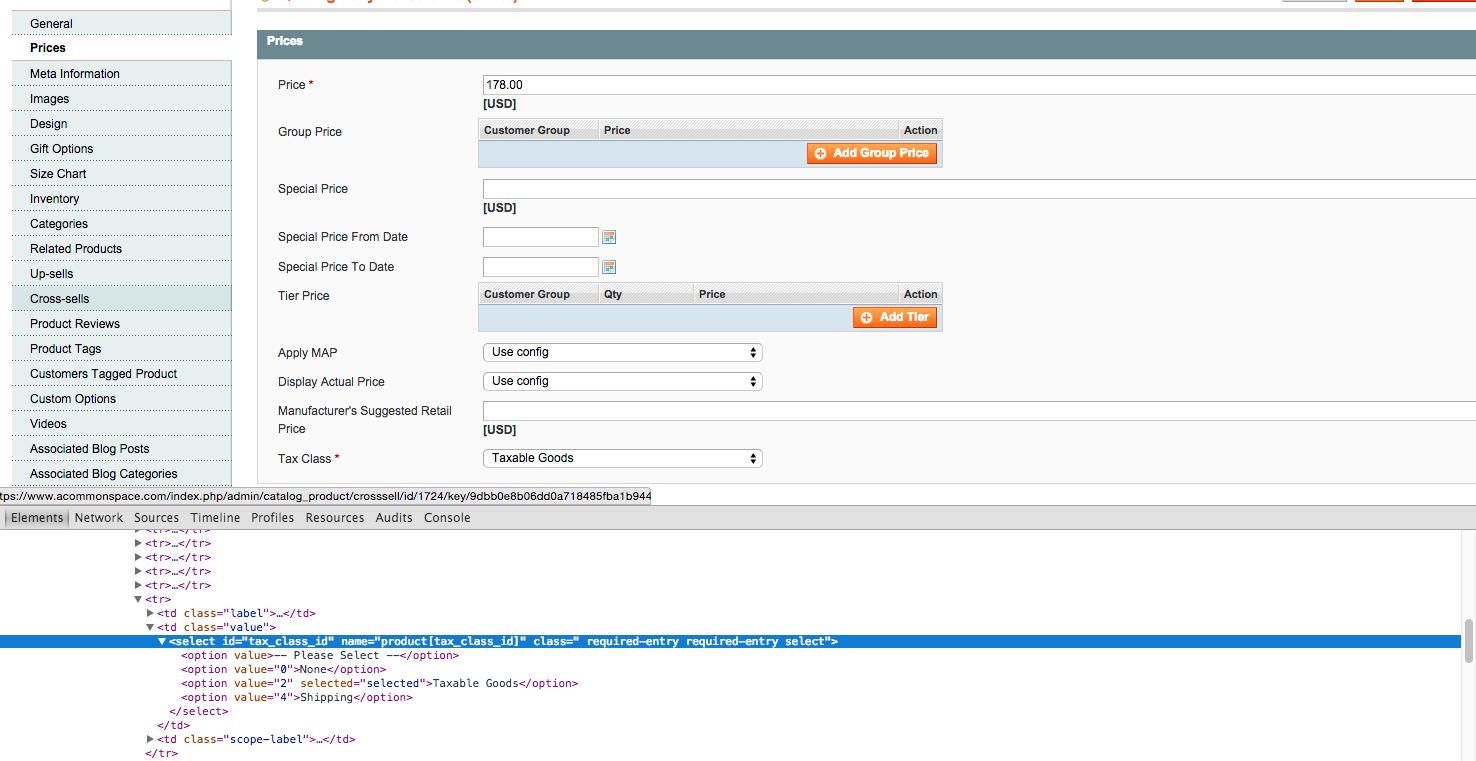
tax_class_id – Refers to what, if any, taxes will be applied to your products. Found in a dropdown menu under “Price” on the Manage Product page and represented numerically in a .csv. Refer to below tip to find out numerical values associated with dropdown menues
short_description – Similar to description, this text field will display in different ways depending on your site’s design. Also, like description, short_description can me made not mandatory by site developers.
weight – self explanatory. Like other fields, if it has no bearing on your site’s business you can enter a dummy number in order to successfully upload files.
TIP – For variables with numerical values, there’s a relatively simple way to “cheat” and find out what number is associated with each option. Using Chrome, Firebug, or any other application that allows you to view the page source:
- Find the field in the magento product page
- Select the variable field (dropdown or text) and inspect the source code – the values and their associated options will be displayed
Best practice for uploading products via CSV:
1) Export a representative of each Type of product to use as a template.
If you do not already have products uploaded to your site, manually add a product of each type and make sure that they are all displaying correctly on the front end.
The most important part of exporting a .csv that will be useful to you as a template is that you export one representative of type of product that will be carried on your site. The most important variations will be type–simple or configurable–and _attribute_set–defined by your site developers.
It’s important to briefly define Simple and Configurable products as understanding their relationship and different characteristics has an impact on the necessary fields in an import:
Configurable Products: Configurable products represent the “face” of a product that exists in different variations. On ecommerce sites these variations will most often be “size,” “color,” or other such variations. The configurable product is what will show on a website’s front end, allowing consumers to add simple products that have been associated with the configurable product to their cart. Examples of fields that may be required of configurable but not simple products are: associated products, multiple images, product descriptions, and much more.
Simple Products: A simple product will be created for each variation of a configurable product. For example, if you are selling a shirt that comes in three different sizes, you will upload three individual simple products in addition to the configurable product. Fields such as weight, price, and others that are dependent on which variation a consumer chooses may be required of simple products where they are left blank on a configurable.
Due to these differences, it’s very important that you find a representative of each type of product so that later you can see the differences on a magento .csv.
Once you have found the products that represent everything in your catalog, you’ll export your .csv which will give you all the information under attribute code column titles (for identifying attribute codes see below).
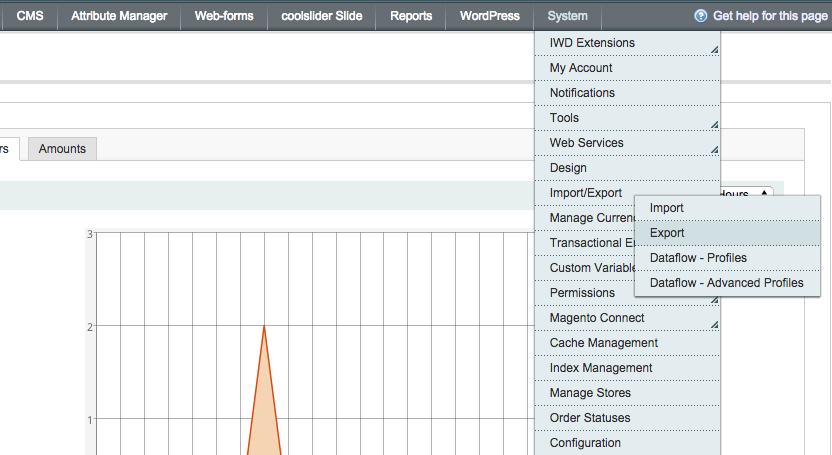
This is done through System > Import/Export > Export.
Select Products:

Note – the simplest way to pull out your sample products for a template is simply to download all existing products and copy and paste your selected samples onto a new template page. However, if you have identified the products that you want for your template, you can limit your export to only the products you want by checkboxing them ( search by sku, name, etc.).
See example:
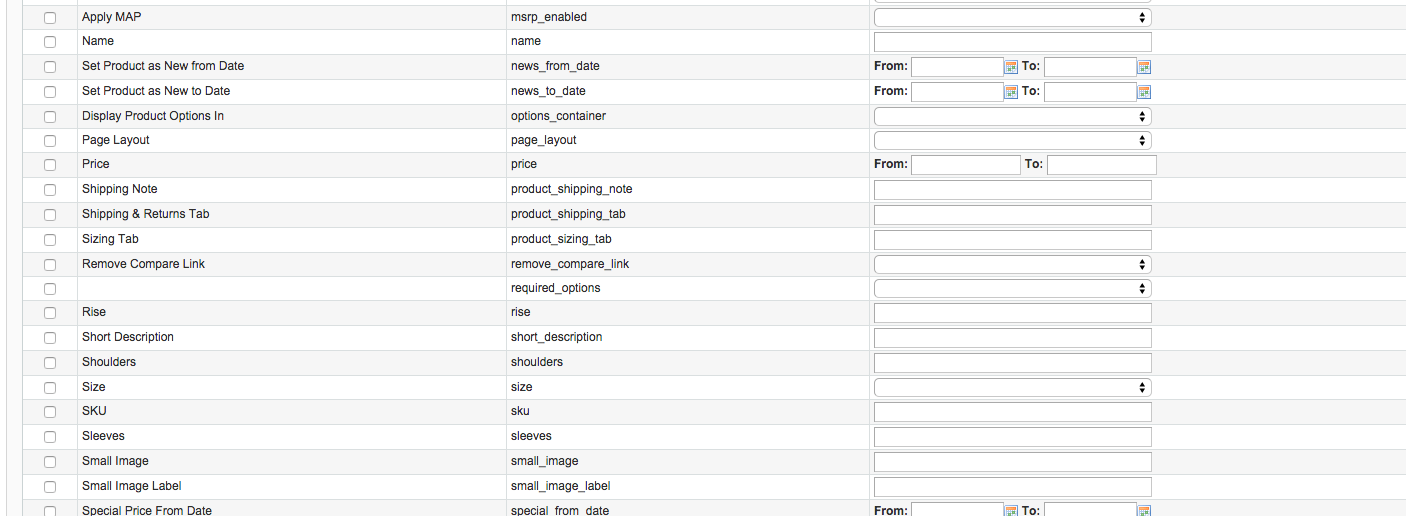
To export click Continue at the bottom-right of the page and open the .csv file in Excel or Google Sheets.
2) Create your template:
When you are faced with the full range of data that is exported by Magento for each product it can be incredibly difficult to view easily. In this case using the Hide Columns feature for attributes that are non mandatory and are not necessary for the information you’re uploading is a massive help.
If the spreadsheet is being filled out by a client for you to upload, providing them with a clear template such as this will simplify the upload process for both parties.
If you are only updating a small number of attributes for many products, you can actually delete all but the mandatory columns, leaving you with a much cleaner spreadsheet.
3) Enter one product from each category into your spreadsheet for a trial upload:
One thing that you want to avoid is spending hours on entering your entire catalog into an excel sheet only to find that you’ve made a mistake and need to go through the entire thing and modify every product. For this reason it’s worth your time to experiment with an upload.
At this point you should have a list of several products, with the unnecessary columns either hidden or deleted for simplicity. When adding to an excel sheet for upload pay close attention to detail:
- fill out fields in the exact format that your example has shown.
- pay attention that you do not include any spaces in your entries – it’s particularly easy to accidentally add a space at the end of an entry when copying and pasting.
- Use caution when using search and replace. Although using spreadsheet shortcuts is a massive help when creating a .csv you need to exercise caution. Never forget about hidden columns.
Once you’ve filled out your sample spreadsheet, you’re able to check the data for errors. After this, you’ll upload. This is a fairly simple process: Go to System > Imports / Exports > Import. Select “products” just like when exporting, and choose file (be sure that your spreadsheet is saved in .csv).
Note- Occasionally you may run into issues if you save your spreadsheet with MS Excel due to its unique encoding. As a result, some recommend using an alternative to Excel to avoid a possible error after completing your sheet.
If you’re lucky, you’ve encountered no errors and your products have been successfully uploaded however, more likely, you’ll get a screen like the following:
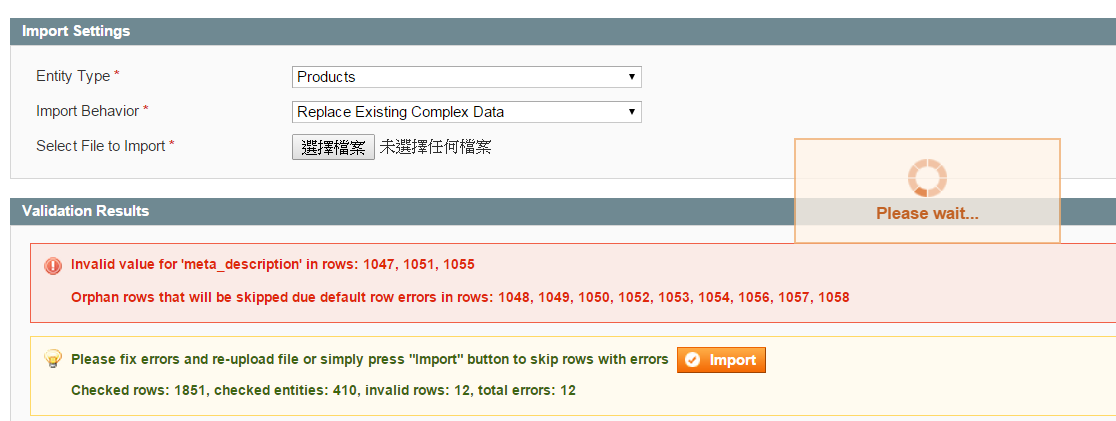
As can be seen here Magento gives you an attribute code (meta_description in this case) followed by the lines on which it was entered incorrectly (or not at all). In this case “invalid value” tells us that it was an error with the format that we entered.
If the error messages do not specify rows you can often inspect the source code of the error message to identify the row with an error.
Just because Magento accepts your spreadsheet does not mean that everything is correct. Be sure to check how your products are appearing on the front end, particularly images, text, and any other information that is may be entered in several different attribute columns in the same format.
When you encounter errors, some of the attribute codes will make sense to you, but others may be a bit vague, and in this case it’s useful to know how to find what the attribute code represents in the backend of your site:
To Identify an Attribute Code (Or the column title on exported excel sheet)
Assuming that you did not develop the Magento site yourself (or even if you did) the column headers on your exported Excel sheet can be cryptic at times, making it hard to know what, if any, information you should enter into the column.
To identify an attribute code:
- Copy the attribute code (column header) and paste it into Attributes in the Magento Back end.
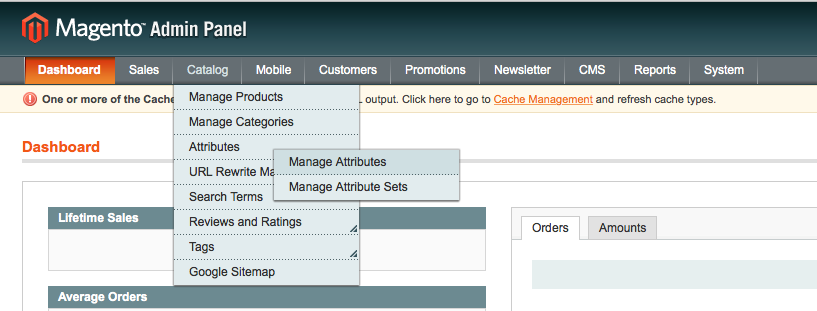
- To do this, navigate from the menu bar: Catalog > Attributes > Manage Attributes:
- Once in Manage Attributes, paste the attribute code into the left-hand “Attribute Code” search box:
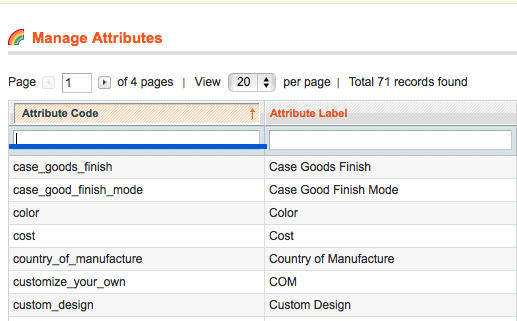
- The “Attribute Label” is listed to the right of your search results, and is also displayed when you click into a specific attribute’s details. In most cases this should be enough to understand the Attribute that the code refers to. For more information, you can look at a specific product in the back end (Catalog > Manage Products > Select a product) to see if and how the attribute has been filled out for the pre existing product.
- Many titles and section headings on front end product pages will directly correspond to their Attribute Label in the back end. Thus you can reverse this process by finding the field you’re looking for on the front end and finding the Attribute Code that corresponds to the Attribute Label, allowing you to find the appropriate column on your spreadsheet.
4) Upload your entire .csv
After you’ve uploaded a sample and identified any errors, you’ll go ahead and fill out all of your products for upload.
Most Common Errors-
Incorrect Case Entry- Entering headers or fields in a case that does not match that of your export is an easy mistake that will cause Magento to be unable to upload. These can occur in unexpected places such as file extensions depending on the setup of your site.
Incorrect Column Headers – As with everything in the .csv upload process, there is no room for error in your variable names. Make sure that your upload .csv has exactly the same field names as the sample that you exported, paying particular attention to capitalization, spacing, and underscores.
Incorrect CSV File Encoding – As mentioned before, this can be due to the program you’re using to save your .csv but can also be a result of differences in location (countries). Be sure that you’re using Unicode UTF-8 when you’re saving your file as this is the only format that Magento will accept.
Incorrect Characters – Some fields may use html code, in which case you’ll need to be sure that you don’t have characters that require special code (for example “<”).
Image Import Errors – Make sure that all of your images are uploaded to the /media/import folder and that your spreadsheet image names are identical to the names in the media folder.
