Amazon Headline Search Ads Overview

Headline Search Ads allow sellers to create banner ads that showcase up to three products and direct shoppers to a custom landing page built from your brand’s products. Keyword-targeted, these ads display prominently at the top of Amazon search result pages on both desktop and mobile.

Note that Banner Search Ads are only available to sellers who’ve been approved through Amazon’s Brand Registry.


At a Glance:

Pros:

  • Guarantee of best real estate when ad shows
  • Ability to showcase brand
  • Ability to showcase multiple products on landing page

Cons:

  • Higher cost per click than other ad formats
  • Not suited for product-specific, long tail keywords
  • Added click between first click and conversion


Amazon Headline Search Ads offer sellers a great opportunity to increase brand awareness, something that’s been difficult in the past for Amazon.

Where traditional search ads will likely be more effective at matching search intent to a specific product, Headline Search Ads allows sellers to showcase their brand (or a subset of its products) in a way that wasn’t available before. n opportunity to get a brand in front of people earlier in the conversion funnel.


How to Use Headline Search Ads

As we see it, most Headline Search Ad campaigns fall into two general categories:

The first strategy involves directing shoppers to a broader brand page–showcasing all or nearly all of your products–with a primary goal of building brand awareness earlier in the conversion funnel. Assisted conversions, rather than “last click,”  are the success metric here as shoppers view your ad’s creative content and begin to associate it with concepts or product attributes.

The second strategy is to create a product landing page with a cohesive set of products that all match the same set of search terms. This is useful if you have similar products which are not listed as variations, allowing you to get eyeballs on multiple product options at once. In this scenario,the ad campaign still aims to drive direct conversions as with traditional sponsored product ads, with a secondary benefit of better brand awareness.


Amazon Headline Search Ad Setup:

Similar to it’s Sponsored Product ads, Amazon makes Headline Search Ads very easy to get up and running. Instead of a step by step, it’s more useful to consider the elements that are available to the average third party or brand page owner:

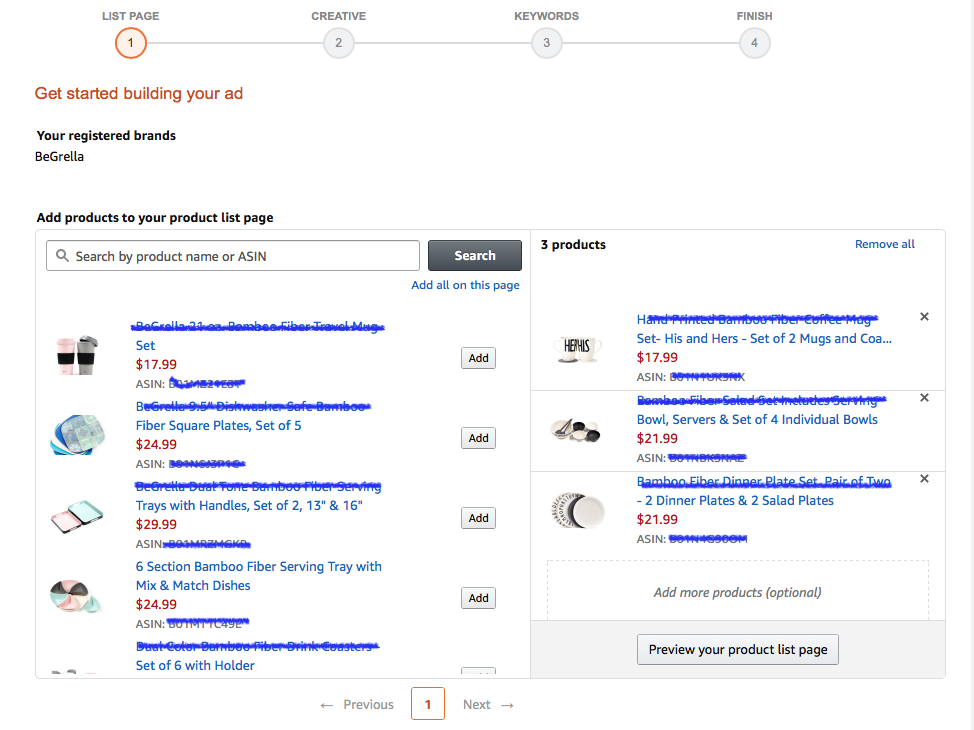
1) Landing Page Products: Amazon allows you to select the products which will display on your campaign’s landing page (minimum of 3). Regardless of whether you’re pursuing a broader branding strategy or a more direct conversion strategy, cohesion is key to both in order to build a landing page that’s more effective. However, if pursuing the latter strategy of last click-type conversions, similarity among your chosen products becomes more important as each one needs to be able to meet one set of keywords/search terms.

Amazon Headline search ads landing page product selection

Build a cohesive product section for your campaign’s landing page.


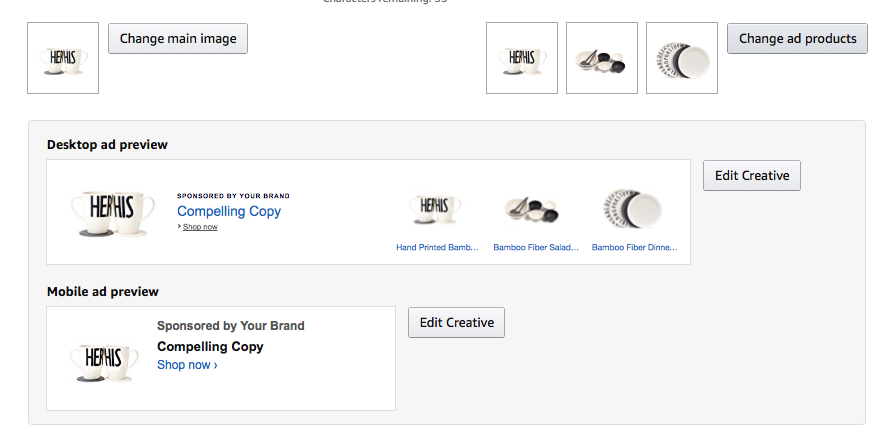
2) Displayed Product Images: Amazon allows you to display 3 products as well as  a “Main Image” which displays to the left of your ad copy. The three products’ main product images will display as thumbnails along with the first 18 characters of their Amazon product name.

The Main Image, slightly larger than the product thumbnails can display either:

– The thumbnail of one of your three chosen products

– The thumbnail of a 4th product belonging to the same brand

– A custom image – a great opportunity to escape Amazon’s restrictive image requirements and get creative!

Keep in mind that only the Main Image and your ad copy will display on mobile.

3) Headline / Ad Copy: Sellers are given 50 characters for their Headline Ad’s copy. Your style here depends on your goal, but it’s good practice to include the primary search terms that you’re using for your ad (just as we all work to get those relevant keywords into our product titles).

In addition, you also have the option to edit your brand’s display name.
Product image selection Amazon Headline Search Ads

Select your product’s headline and product image display


4) Targeted Keywords: Headline Search Ad’s keywords are set up using exactly the same interface as Sponsored Product ad campaigns. Aside from the additional consideration of branding benefits, keywords should follow the same best practices as any other ad campaign, namely relevance, relevance and relevance. Choosing one set of target keywords for multiple products means this is worth extra consideration, A/B testing, and monitoring in the case of Headline Search Ads.

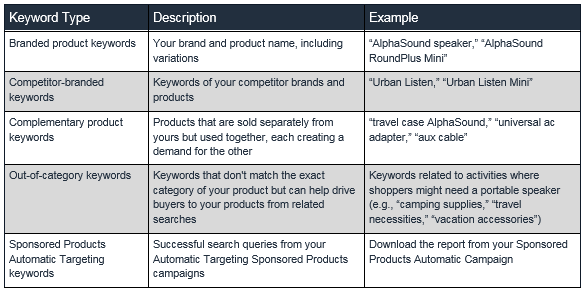
Amazon’s guidelines for HSA keywords are as follows:

amazon keyword guidelines headline search ads


For more on what Amazon has to say about Headline Search Ads, check out the following links:
1) Headline Search Ads Optimization Tips (Amazon)

2) Headline Search Ads Overview (Amazon)

What does “Business Buyer” Mean in Seller Central Orders?

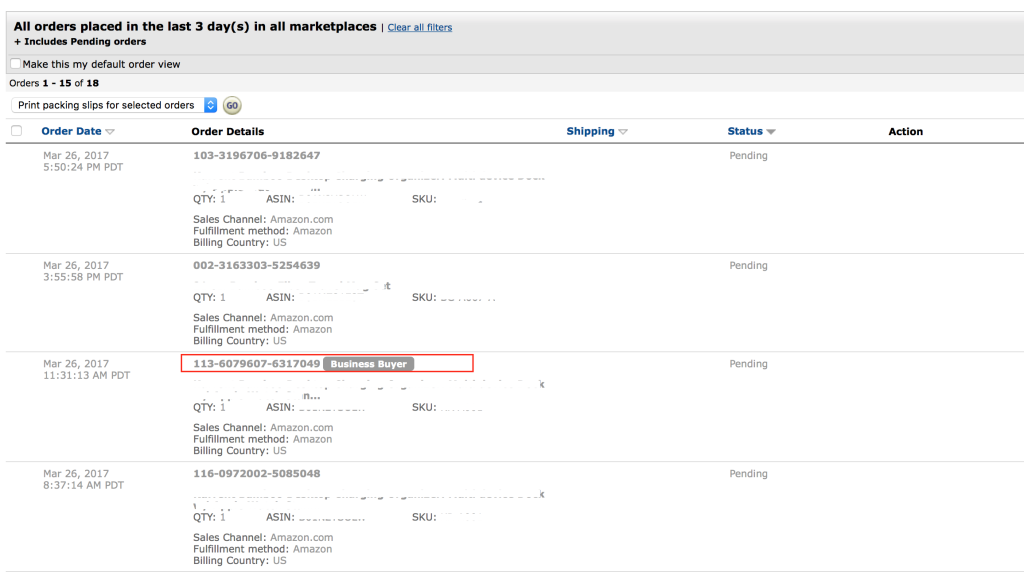
If you’re selling on Amazon, chances are that you may see the label “Business Buyer” next to an order number. This can appear in your Orders tab or in your Sales Reports.

business buyer order seller central

What does this label mean?

This label simply means that the buyer is registered with an “Amazon Business” Buyer account. From their end, this gives them access to extra features that aren’t included in normal Amazon accounts, including some extra flexibility, and analytics. Most importantly, business buyers have access to special pricing provided by sellers participating in the Amazon Business program.

What does this mean as a seller?

If you’re seeing multiple orders from Business Buyers, it’s a fair bet that you may benefit from being able to target this market with special pricing and several other advantageous features. If this is the case, you’ll need to apply as an “Amazon Business” Seller.

The business seller program has a higher bar for seller performance and asks that you be able to accommodate certain business purchasing needs (e.g. recognition of buyers’ tax status and provision of purchase orders).

However, the benefit of being able to offer lower prices to a higher tier of purchasers may well be worth the small hassle of application and qualification.


Registration and Qualification

To register as a business seller follow the below link (Note: Seller Central Accounts Only):

https://sellercentral.amazon.com/business/b2bregistration

The below Seller Central Link answers FAQ and includes the basic requirements for approval into the business seller program. As it requires logging in to Seller Central, the basic requirements are pasted below as well.

https://sellercentral.amazon.com/gp/help/201750810

In Amazon’s own words:

Who is eligible for the Amazon Business Seller program?

Sellers who have the capability to fulfill the following requirements of business customers.

  • High bar for performance. 
    Selling on Amazon Amazon Business Seller program
    • An Order-Defect Rate (ODR) of 1% or less. 
    • Pre-shipment Cancellation Rate of 2.5% or less. 
    • Late Shipment Rate of 4% or less. 
    • An Order-Defect Rate (ODR) of 0.5% or less. 
    • Pre-shipment Cancellation Rate of less than 1%.
    • Late Shipment Rate of less than 1%.
    • Few chargebacks, A-to-z Guarantee claims, and negative feedback.
  • If the seller participates in Amazon’s tax calculation services, the seller must honor the customer’s tax exemption through the Amazon Tax Exemption Program. 
  • There must be a tracking number on every business order package.
  • There must be a packing slip with every business order package.
  • There must be a purchase order number with every business order package.

Have any questions or feedback about this post or the Amazon Business program? Let us know below!

Download Your Product Inventory File from Amazon Seller Central

One of the most useful things that an Amazon vendor can have is a file containing all of their products’ listing information (i.e. SKU, description, bullets, and all product detail fields). In addition to being a database of essential information that can be used for analysis, comparisons, and records, it can also be really helpful to someone who’s looking for a template for csv product uploads. Seller Central doesn’t make it simple to download or even view this information in one place. At least it doesn’t anymore.

Here’s a quick tip on how to get this information:

  • Open a ticket with Seller Support and request that they enable your account’s Category Listings Report
  • Once you’ve received an email confirming that they’ve enabled your report (be sure to check email to see if there is a time limit on your ungated reports):
    • Go to the Inventory dropdown and select Inventory Reports > Select report type > Category Listings Report

This is the simplest way to get a comprehensive file that includes all of your details about your products listings.

If anyone has any suggestions about better or more comprehensive methods for the average vendor to get this information please share them with us!


Get Started With Amazon PPC -Auto Targeting Campaigns

amazon auto targeting ppc banner

With small margins due to the competitive nature of the marketplace and a search algorithm that might not be as intuitive as Google’s, it can be difficult to figure out where to start with Amazon’s PPC advertising campaigns. A simple but effective strategy to start by using an Automatic Targeting ad campaign.

Auto Targeting is a great way to begin to collect information on what search terms are associated with your products or, more specifically, what search terms Amazon thinks should be associated with your product – essential information. A good way to look at it is as an investment in data for future campaigns – as well as a paid boost to a product’s sales rank.

Setting up an auto targeting campaign is incredibly easy. Start by mapping out a daily budget that you can afford. Unless you’re under serious time pressure, it’s best to start with a low daily budget in your campaign settings and then increase it incrementally until you’re getting the amount of sales and/or data that you need.

The actual setup of a campaign is straightforward. If you have a Seller Central account you can begin here.

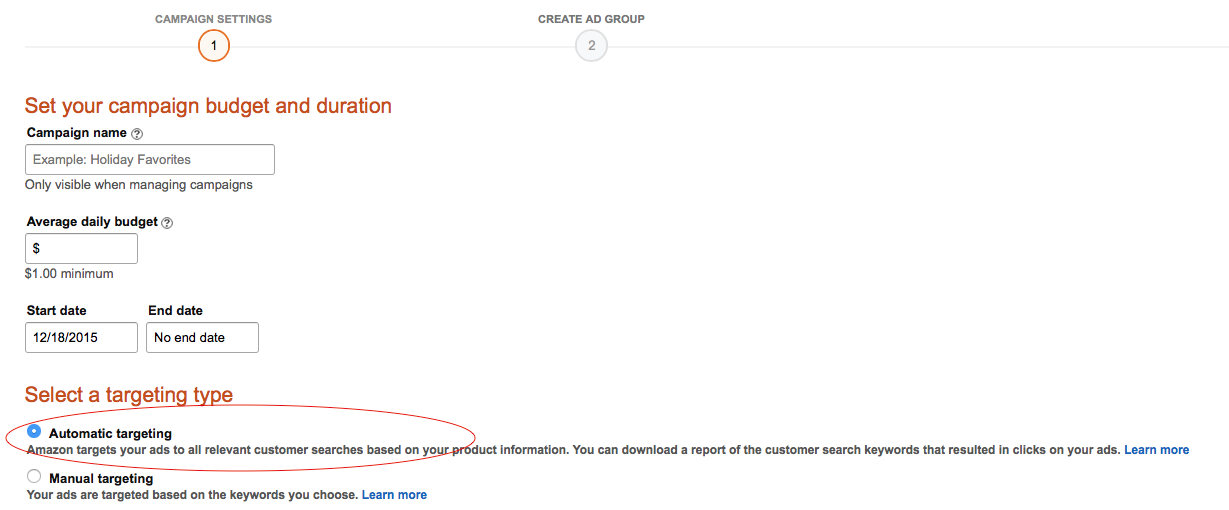
Note that auto targeting is chosen at campaign level as seen below:
amazon automatic targeting ad campaign


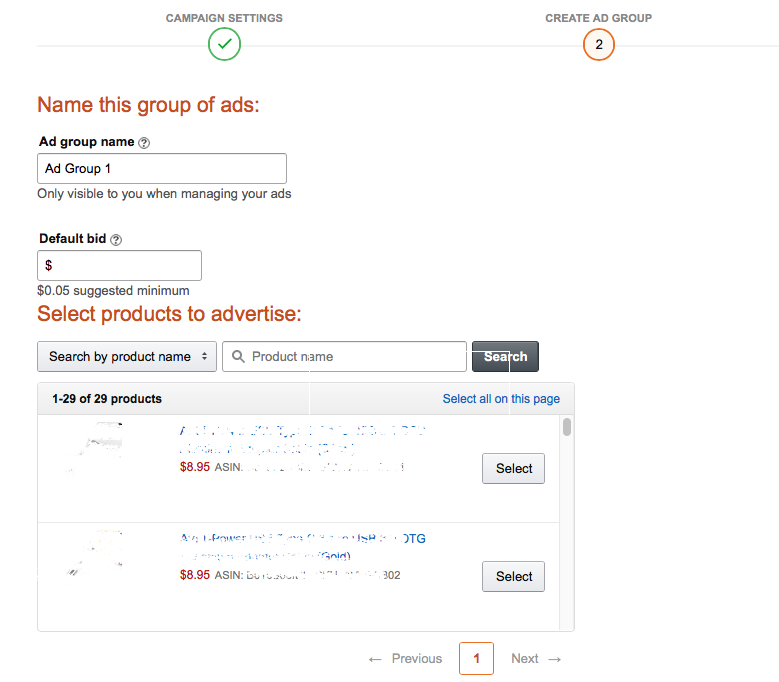
On the next page, it’s as simple as selecting the products you’d like within one adgroup. Be sure to set up individual ad groups for variations of a single product to get the most accurate data possible.

A quick not for anyone new to Pay Per Click Advertising, the Default Click field what you’ll pay when an Amazon user clicks on your product ad. Your costs consist only of clicks, not impressions (display of the ad)

amazon auto targeting ad group


Search Terms Report

As your campaign runs, you can view the number of impressions and clicks that your product is getting in the Campaign Manager of your Seller Central account. Once your campaign has been running for a couple of days, you can start to download more detailed information on search terms. You can get to this page either by clicking into your ad group and following the link (below) or going to Reports > Advertising Reports > Search Terms Report.

Ad Group Overview:

ad group overview seller central


Search Terms Report Download:

download search terms report amazon seller central

Once you’ve downloaded this report you have some concrete information with which to start assessing your ad strategy. Not only do you have a list of the search terms that are actually being used by shoppers to help hone a manual keyword list, but you’ve also got an idea of how Amazon identifies your product which can be useful for improving the product detail page itself.

The Report itself includes:

  • Search Terms
  • Ad Impressions
  • Ad Clicks
  • Total Spend
  • Avg. Cost Per Click
  • Click thru Rate
  • Product Sales
  • Conversion Rate
  • Cost per Sale


Negative Keywords:

Because we’re using the auto-targeting as an information gathering tool in this example, it’s best to let your campaign run until you have a significant amount of information (a “significant amount” will vary from product to product, and seller to seller). However, after running for a short period, you can begin to add negative keywords. In the beginning, you can identify the obvious mistaken keywords (“Chicago Bears” turns up for your Teddy Bear). As your campaign runs for a longer period, you can begin to get more serious about weeding out negative search terms and try to get a positive return from the auto targeting campaign (This is not always the best strategy, or even possible, but if it’s making you money it’s making you money).

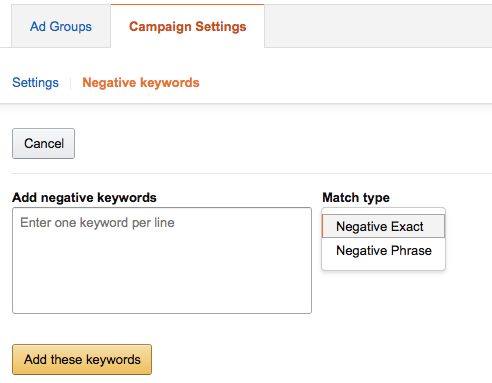
Adding negative search terms is another simple process in Seller Central. After identifying search terms that don’t relate to your product with the search term report, you simply click into the auto ad campaign > campaign settings >negative keywords > add keywords. Note that Amazon has an Exact Match and Phrase Match option for negative keywords. Be sure to choose the correct match type – in most cases you’ll want to choose Exact Match to avoid losing relevant search terms.

amazon negative keywords auto campaign


Adding negative keywords on a regular basis is good practice if you’re trying to hone a keyword list but still want to collect Amazon Auto Campaign data or, of course, if you’re running an auto ad campaign with the expectation of a ROI.


Ultimately, Amazon’s auto-targeting campaigns have the potential to be profitable to sellers. However, they can also be a worthwhile investment in data for broader use in optimizing manual PPC campaigns and creating product detail pages that rank for the correct search terms.

Providing Exclusive Discounts on Amazon

Banner for amazon promotions article

Many vendors on Amazon find themselves needing to provide a discount on one or more of their products to a specific person or group of people. A prime example of this would be when a vendor would like to offer a discounted or free product in exchange for increasing product exposure and getting reviews. Not only can using a promotion such as this allow you to increase your reviews but, those reviews will be “verified purchases.” As an added bonus, your products will likely receive a bump in sales which is always valuable, no matter how small.

Offering this discount is a pretty simple process with your Seller Central account. Below is a short step by step guide to creating a basic discount that you can share with a select group of customers:

Once logged into Seller Central, go to Advertising > Promotions:

Amazon Seller Central Promotions Page

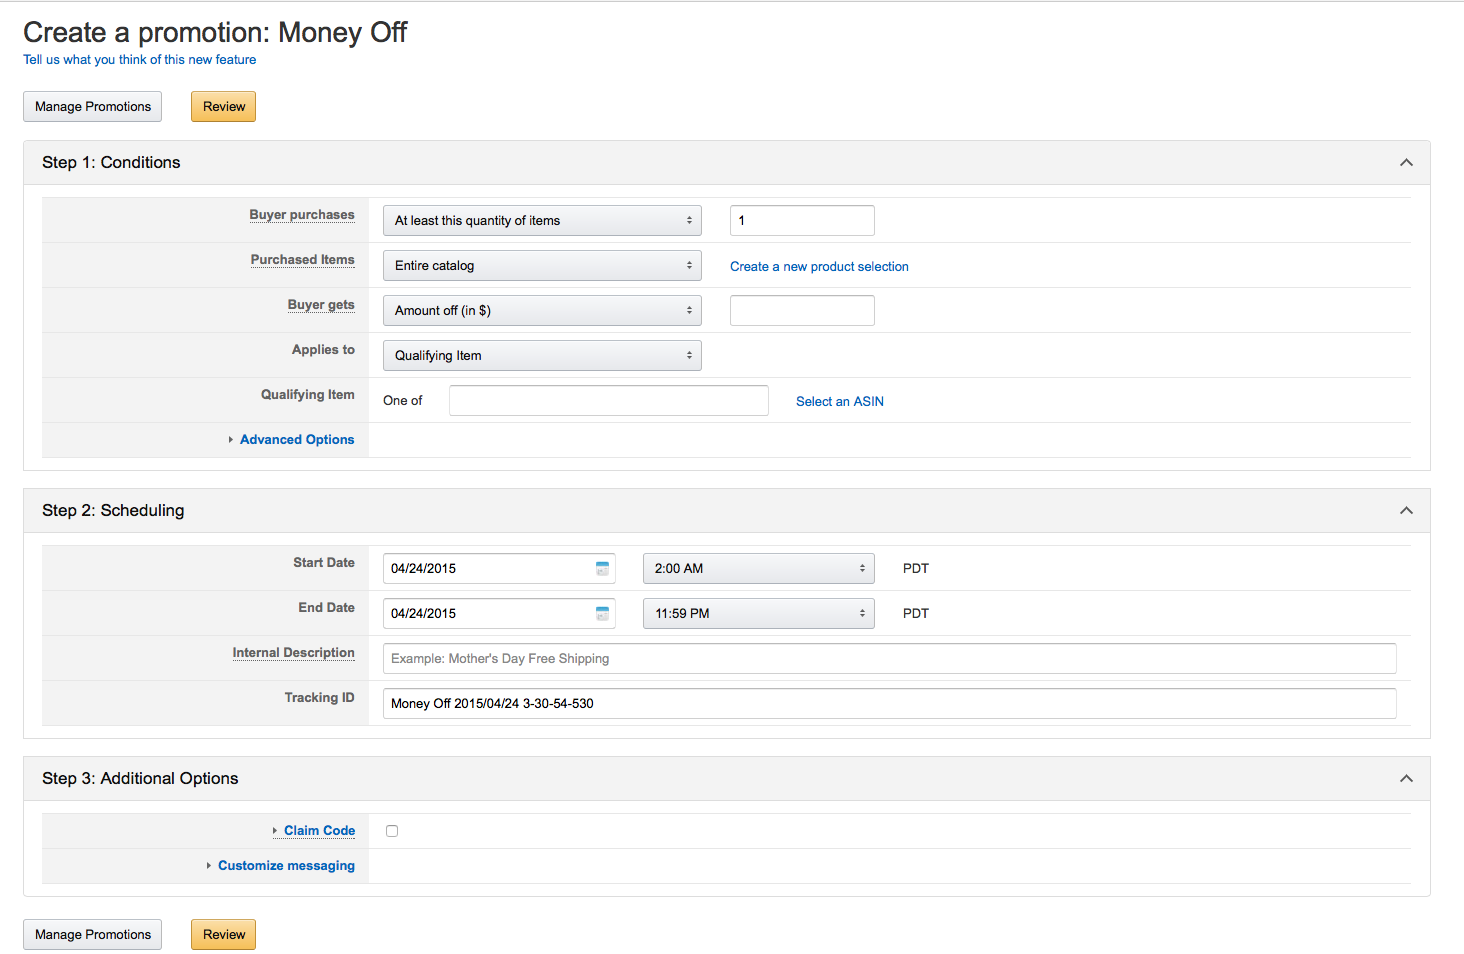
On this page, you’ll select the “Money Off” option, which will take you to the promotion details page:


Amazon Money Off Promotion Page

Most of these fields are pretty self explanatory. For this example lets say we want to offer one newly-released products for free.

Step 1: Conditions


  • Buyer Purchases – in this case I will select “At least this quantity of items” and “1,” as I want the recipients of this promotion to receive it without buying multiple products.
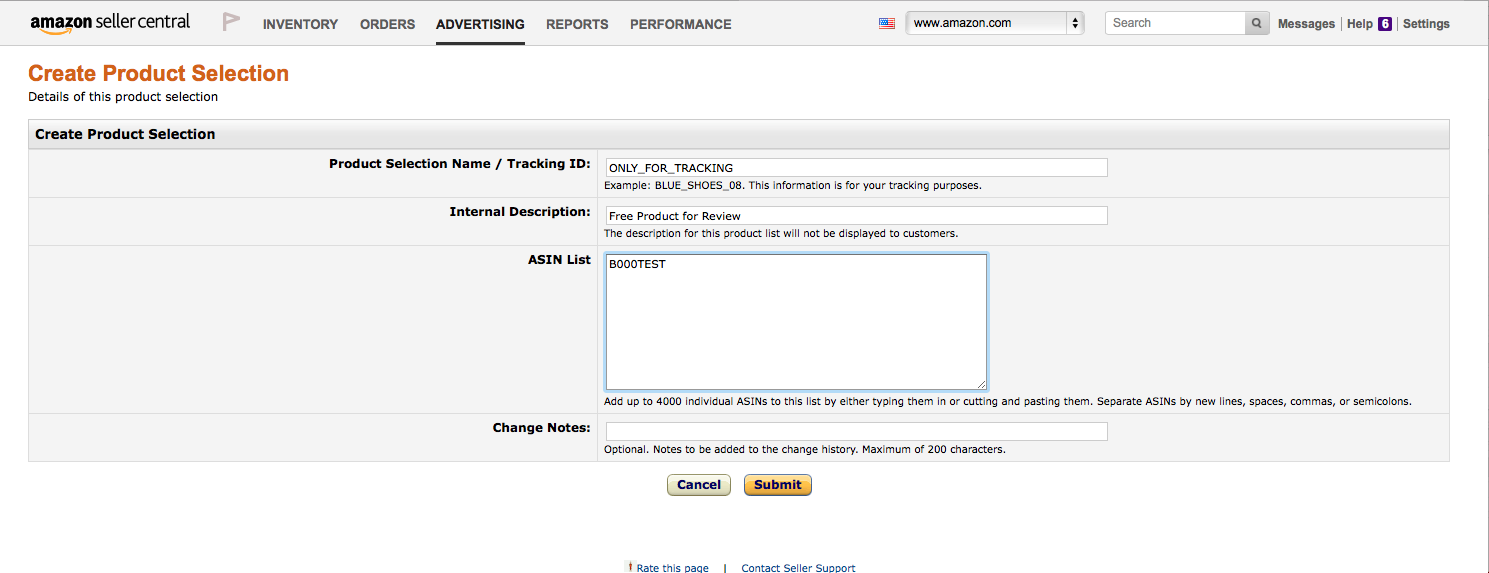
  • Purchased Items – for our purposes I will create a product selection that includes only the product I want to offer. After clicking on the link “Create a new product selection” to the right of this field you’re able to create a selection based on SKU, ASIN, and more.
    • If you add multiple items to your selection, based on these conditions, anyone purchasing any one of the items in your product selection will be eligible for the discount.

Amazon Promotion Product Selection Creation


  • Buyer gets – gives you the option to discount by either a percentage or fixed amount. The simplest way to offer a product for free is to simply select “Amount off (in$)” and input the full price of the product.
  • Applies to – for our purposes we will select “purchased items,” meaning that it will apply to item(s) we set up in the purchased items field.
  • Advanced Options – gives you the option to exclude subsets of your catalog, but is not relevant for our purposes of offering a promotion on one item.

Step 2: Scheduling:

This section is also very clear in terms of filling out conditions, offering you a time span with a start and end date and time.

  • It’s a good idea to set the time span to a period that you know you’ll be able to easily monitor, particularly because Amazon requires that discounts be set up at least four hours in advance. You should plan ahead to be sure that you can check that the discount is active when it should be.
  • Internal Description is solely for you. A simple description will do. i.e. “Product X Review Giveaway.”
  • Tracking ID – Again this is for tracking purposes, and may not be very important unless you have large scale sales and promotions on Amazon. This field is automatically filled out by Amazon with a default ID.

Step 3: Additional Options:

This is the section where you are able to confine the discount to only a select number of people that you’ve shared it with.

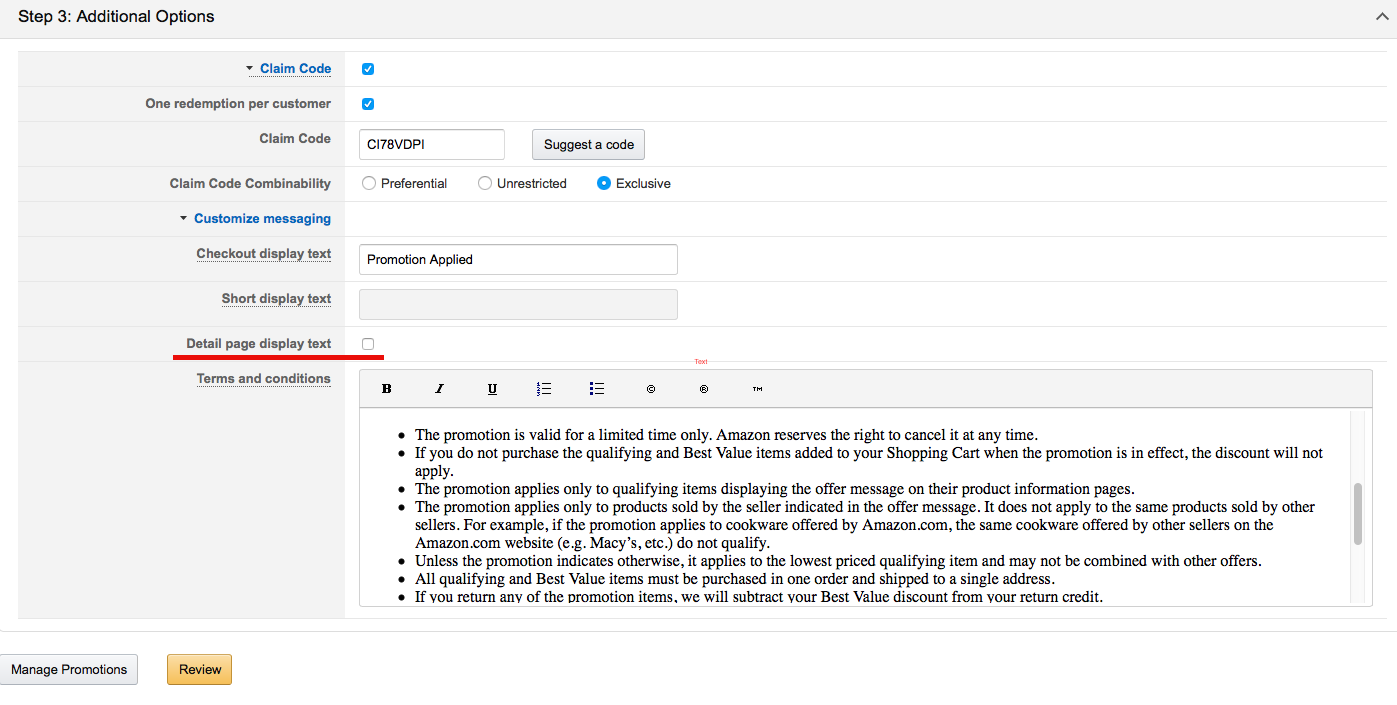
Click the checkbox next to Claim Code to see the following options:

discount code for amazon coupon

  •  One redemption per customer – be sure to select this checkbox to avoid giving one customer hundreds of free products.
  • Claim Code – Amazon will give you a randomly generated. You will need to go to “Manage Claim Codes” to generate a specific number of one-time use codes (See step 4). Otherwise, if you choose to use this code, it will be restricted to one user but users will be able to make the code public.
  • Claim Code Combinability – in this case we will select “exclusive,” due to the fact that we are offering a free product. This is generally a safe selection unless you have multiple promotions running which you want to combine in custom ways.
  • Customize messaging – This field can generally be left in the default format. However, be sure to UNCHECK Detail page display text if you do not want anyone who views your product to take advantage of the discount.

amazon promotion private claim code setup

After reviewing and submitting, you’ve set up a promotion with a private claim code. As stated before, particularly with the delay in Amazon’s system, be sure to test your promotion when it is set to go into effect – both to make sure that it works in the checkout process and that you’ve set it up correctly and is not appearing publicly.

Step 4: Exclusive Claim Codes

At this point you can create a specific number of claim codes that can only be used once, rather than being restricted only by one use per user.

Click the tab Promotions > Manage Your Promotions  and select the promotion you’ve just created (be sure to check “pending” promotions).

Once you’re viewing the desired promotion, click on Manage Claim Codes. Here you have the opportunity to Generate Claim Codes which you can download from Amazon to provide to reviewers or other customers. As long as you’ve followed the proper steps when setting up your promotion, this will allow you to rest easy knowing that your codes are truly exclusive.

Good luck!