Cyber Security Practice for Individuals and SMBs

Cyber Security Best Practices Article Banner

The most secure methods for protecting personal and sensitive information are constantly evolving as industry practices and bad actors continue to push each other to the next level.

However, there are several best practices to follow that minimize your risks and, by extension, the risk of any organizations that you belong to. Below we outline a few starting points which protect both individuals and businesses.

  1. Basic Best Practices
    1. Track Breaches and Leaks
    2. Password Security
    3. 2FA Authentication
  2. Browsing and Usage Habits
    1. Confirm SSL Connections
    2. Caution with Email Links and Requests
    3. Up-to-date Operating Systems
  3. Organizational / Company Security
    1. Structured Access
    2. Access Sharing
    3. Employee Changes
    4. Clean Desk Policy
    5. Document and Educate
    6. Alligator Moats
 

Basic Best Practices:


Find out whether your data has already leaked:

If you’ve been active online for a while, there’s a good chance that you’ve already been involved in some sort of data leak. A cool website built by Troy Hunt, https://haveibeenpwned.com, scrapes a variety of public sources to provide a database of compromised emails and accounts associated with breaches.

You can subscribe for notification if your email is discovered in any future breaches, hopefully giving you a better chance of mitigating any fallout.

If nothing else, check out this site to get a sense of how common data breaches are and get inspired to put in a little extra effort.  

Passwords:

The best place to start in securing yourself and your organization is your passwords. For the points steps below, a password manager such as Last Pass is a great option that allows you to quickly create, update and manage your passwords.

If you’re an organization for which security has to be absolutely airtight, you may want to manage your passwords internally. However, in most cases, the security gained from a dedicated third party manager is greater than the risks of having all your passwords in one location.

Password Makeup: The obvious starting point for security is to ensure that your passwords are making use of as many characters as possible.

If you’ve tried to use your old go-to password from 2005 (e.g. myDogsName) you’ll notice that most sites won’t accept a simple string of letters anymore. However, simply substituting a 0 for an o and adding a “!” isn’t much of an upgrade. Massive databases of common substitutions and punctuation placements makes the password myD0gsName! only marginally more secure than the original.

Modern browser versions as well as password managers will auto generate and store complex passwords for you. When using an application like this, there’s no reason not to make your passwords as long as possible, making them exponentially more difficult to crack.

When storage of an auto-generated password isn’t an option (e.g. your password for your password manager), a good method is to create a “passphrase.” For example, YouknowmybirthdayisonJuly2(woohoo)butyoustillwon’tcrackthis!

Password Diversity: Making use of unique passwords for different accounts means that, when a breach occurs on one account, the remainder of your accounts don’t immediately become available to whoever gives it a shot.

Password Frequency: Similar to above, changing your passwords at regular intervals reduces the chances of being affected even if your account information has been compromised. If you’re working with software like we do, you can often set passwords to expire at set intervals.

Two Factor Authentication (2FA)

Wherever possible, use 2 factor authentication. Despite hackers finding sophisticated ways around 2FA, it’s still an extremely important component of online security

Nearly all major companies now support some form of two factor authentication through apps such as Google Authenticator and Authy or direct SMS.

If you can’t be bothered to use 2FA for all of your accounts, be sure to have it in place for the most crucial ones such as your email and your password manager (any accounts that share access and information with other websites and services).

If you manage an organization or network, we’d suggest making 2 factor authentication mandatory for all users.


Browsing and Usage Habits (Operational Security)


Confirm SSL Certificates

There’s really no excuse for websites that store any personal information (not to mention accept payments) to be without an SSL certificate. Up-to-date browsers are increasingly forceful about alerting you to being on websites that have insecure elements but you can ensure the connection with a browser extension such as HTTPS Everywhere by the EFF.

The most common way for your accounts to be hacked is not through a superspy remotely hijacking your computer but rather through simple emails that trick you into forking over the keys to the kingdom.


When you receive an email with any request for you to login or provide information, take an extra moment to verify the domain of the sender and the domain of the link provided. Not seeing a green HTTPS padlock on any login page is a significant red flag.

Any company that takes security seriously will not ask you to provide your password via email or phone call.

In the event of any suspicion, look up publicly listed information and contact them directly.

Furthermore, look out for unusual requests from contacts within your organization or contacts list. Maybe you have a great password, but your friend doesn’t – use another channel to confirm that the request really came from your friend or coworker.

Keep Operating Systems and Applications Up-to-Date

Easily skipped over inconvenient interruptions, the updates to your browsers, software and operating system often include crucial security patches.


Organization Security


For most smaller organizations and businesses, the best first step is to enforce the points outlined above at at an organizational level: have minimum password requirements, use an organization-wide password manager and require 2FA for any accounts connected with your business. Wherever possible, enforce enforce enforce! It’s easy for all of us to get complacent so, wherever it’s an option, enforce these measures through software or platform settings (microsoft, G Suite).

Again, these tips are a supplement rather than a substitute for a comprehensive internet/information security plan.

Structured Access

Larger businesses should have systems in place for a hierarchical information access. However, it’s important to implement for smaller businesses as well, even if it’s not an explicit policy – the basic concept is to segment access so that individuals (and networks) are only interacting with the information that’s necessary for their work.

At smaller businesses and startups where one individual can wear a lot of hats, it’s rarely so black and white. However, it’s still important to take basic steps to audit access at scheduled intervals.

Don’t Share Access

This may sound obvious, but, particularly in smaller organizations, it’s very easy to make “exceptions” in the interest of expediency, particularly when clients are involved as they our in our daily workflow. In those situations, it’s helpful to be able to fall back on “I’m sorry, we’re unable to do that due to an internal policy,” as it draws a line on the conversation, even if someone thinks they have a compelling argument for sharing.

Employee Changes

When an employee moves on, it’s an absolute must to change their passwords and review access immediately. Make sure that someone is responsible for a full audit of their access to primary and related company accounts. The more organized your password and SOPs for access management, the easier this is.

Clean Desk Policy:

For offices with access to sensitive information, communicate an explicit policy against any written passwords or credentials being left on desks where passers-by can see them.

Document and Educate

The fact is that we’re all busy and security can easily become an abstract concept that takes a back seat to the immediate task at hand. The more that your security measures are documented and communicated, the less likely they are to be considered “suggestions” by employees and coworkers.

Implementing a regular audit of password security, 2FA and access and communicating best practices for operational security in writing makes security more tangible. Making it clear that these steps are for each individual’s security can be more effective than a dry document about company assets.

Alligator Moats

The modern business needs to be alert to more than just cyber threats; ninja’s are out there and you need to take actions to defend against them.

After you’ve dug your moat, we’d recommend investing in robot alligators – regular alligators just eat bad ninjas, cyborg alligators laser them and eat them simultaneously. Any serious security professional will tell you that this is just good sense.

Ok, just kidding… get regular alligators
10 Getting Started with JIRA: User Interface

This article is a part of Astral Web’s Comprehensive Guide to JIRA!

COMPREHENSIVE GUIDE TO JIRA 10

Previously: 09 Getting Started with JIRA: User Roles & Permissions

By now you may have gotten used to how JIRA Clouds looks and navigates, but here are some additional details about the interface that you may or may not already know.

Dashboards

Dashboards are the first page your users will land when they log into JIRA. The space is useful for filtering and sharing JIRA information, which is achieved by adding different types of gadgets such as search filters, pie charts, and other data collection formats.

image1

System Dashboard

The default dashboard you will get when you start JIRA is the System Dashboard. This default dashboard includes the “Introduction”, “Assigned to Me”, and “Activity Stream” gadgets. These are basic and fairly useful, but there are much more gadgets that JIRA provides for you to make user of. To do this, you will need to create new custom dashboards.

Custom Dashboards

To add or modify more gadgets, you will need to create a new dashboard since you cannot make changes to the default dashboard. Select the top right “…” icon and select “Create Dashboard”. You must be an admin or user with permission to create new boards, and usually only the creator or user with higher permissions will be able to make changes.

Add a name (e.g. “Project Team ABC Dashboard” or “Design Team Dashboard”) that will be relevant to the users who will be using this dashboard.

image4

We have created 3 basic levels of dashboards for our teams. Our highest level is a “Company Dashboard” that displays top level overall project information so we can quickly view the status of multiple projects at once. Only administrators can access this dashboard. We also have dashboards for each team by function such as “Design Team”, “Development Team”, and “Sales Team”. These filter projects and issues so they are most useful for each team and their members. We also have “Project Dashboards” for larger projects, so the project managers can get an overview of their entire project on the dashboard.

We use different dashboard gadgets to share information. For example, our Project Dashboard shows a calendar with hot issues, a line chart to show how many tickets have been created, and a pie chart to show the status of all of the tickets. This helps us understand the overall situation of one project.

image7

Dashboard Gadgets

JIRA offers a few dozen dashboard gadgets to use. There are some 3rd party gadgets that can be purchased, but we have never tried any. Not many of the gadgets are amazing, but they do basic data collection and show different charts. The Calendar gadget and Pie Chart are some of the most useful ones. We recommend you to try all of them to see and feel if they are useful for you.

image5

The most important factor is the data you are feeding to the gadget, which is all controlled by another feature called “Filters”. We will discuss how to use Filters in another article, but note that adding a gadget will not have enough power to filter fine details.

One type of gadget that is missing and we would love to have (which apparently used to be available in a much older version) is one that can add plain text or code. JIRA decided to remove these features. But, we do describe in our previous article that the “Introduction” section under your JIRA General System Settings is the only and best way to share custom text and basic code. Otherwise a 3rd party gadget may fulfill your needs.

More Dashboard Space

Select the “Edit layout” button to change the dashboard layout. You will be able to select between basic 1-3 columns. We use the default 2-column layout since it’s a good balance. The 3-column layout gets too small to show detailed information. You can try switching between them to see which works best for you. Just be careful that your gadgets may jump around when you make changes.

image2

You can also improve your viewing space by making the side menu smaller. Click the divider between the left menu and right side content to make the menu bar smaller. It isn’t much, but it does help to show more content on the right side if you have a small monitor. Otherwise you can zoom out on your browser (e.g. “ctrl” + ”-”) to see more.

image3

Look and Feel

The overall usability of JIRA Cloud cannot be changed so much, but you can change the logo and colors of your interface. Go to the section under “JIRA Settings” > “System” > “Look and feel”.

We added a nice company logo (and JIRA since we had some extra space), which needs to be around 368px by 64px. There are also options to show Titles on browsers tabs, Colors, and Time Display.

image6

You can only choose two colors for interface. The background color of your sidebar, and the Text and Icon colors. It would be nice to have more control, but you can at least unify colors for easy reading or differentiate between multiple Atlassian web-apps, or just having the right color for your company.

image8

JIRA Cloud, as most web-apps, is limited to modifying the interface, but we hope these tips help you improve usability for your team members.

Next: Getting Started with JIRA: Issue Management with Basic Agile Workflow

09 Getting Started with JIRA: User Roles & Permissions

This article is a part of Astral Web’s Comprehensive Guide to JIRA!

COMPREHENSIVE GUIDE TO JIRA 9

Previously: 08 Getting Started with JIRA: Manage Your User Profile

General Configuration

After we have added some users that can help configure and check our changes, we can now complete our general configurations that apply to your entire JIRA system.

The “Title” of your JIRA should be related to the overall system. We just simply named ours “Astral Web’s JIRA”. The naming isn’t too important, since the most prominent place you ever see it is in the tab title area.

image10

A very useful setting is the “Introduction” section. This section allows for some basic JIRA markup code that lets you add links, styling, and images.

image11

Go ahead and select “Edit Settings” to make changes.

image2

JIRA dashboards don’t allow any html code (unless you buy a 3rd party plugin), but you are able to add the “Introduction” block, so it may become useful for sharing important notes with all of your users.

Here is an example of how our Introduction block looks like on our main dashboard.

image4

Use the “Internationalization” settings to configure default language settings for all of your users. We use JIRA in both English and Chinese with English being our primary language, so we have “Other” for Indexing and “English” as our default system language. Language display settings can be changed per user as described in our previous User Profile article.

image5

Options are useful if you want to customize even further. We used the default setting as-is, but you can optimize what users see and access by turning on or off all the features you actually need to use. For example, Voting is a great feature for prioritizing issues, but we don’t use it in any of our teams. So, we could turn it off and keep it hidden from all of the interfaces. For now, our teams just ignore these options if we don’t need them.

Security

Security options are going to be important if you have different types of internal or external users on your project teams. You don’t want all of your users to have admin powers that allows them to accidentally add or remove important users, features, or billing options. Define which users are admins early on, so only specific users have access to these high-level options as described in our previous articles.

Project Roles

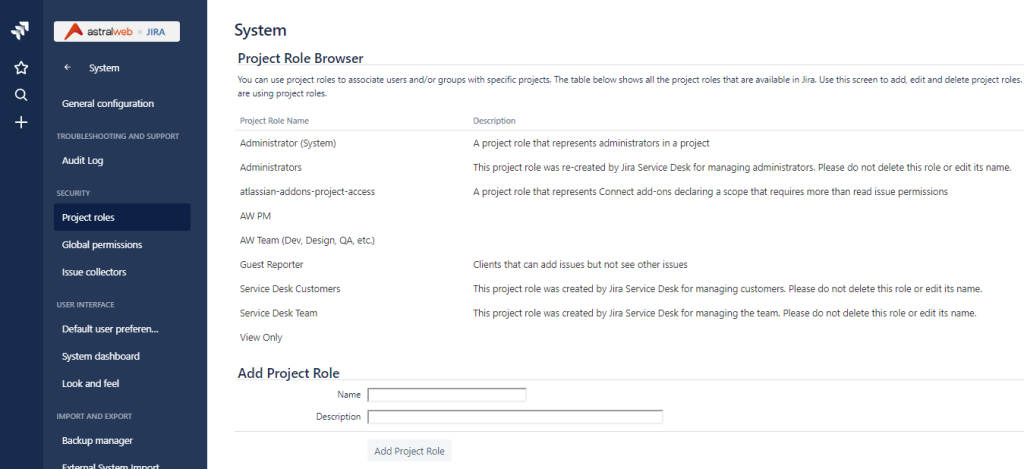
Project Roles are what you want to change for all the types of users you want to define and configure permissions for.

image7

In addition to the system Administrators roles, we have added “PM (Project Manager)”, general “Team Member”, and “Guest Reporter” roles.

Project Manager Roles

PMs will have full access to their own projects allowing them to add/remove users and configure their projects as they please. The highest-level option they have is to delete their project. They cannot change global settings such as system settings, workflow schemes, etc.

General Team Member Roles

Team Members can only be invited to a project by a PM, and can only create, edit, and delete issues within the project. They can see other users’ issues and support editing them, but they will not be able to change any project settings.

Guest Reporter

Guest Reporters are roles reserved for our external stakeholders who need access to our project tickets. They can never see other projects, nor can they view issues they are not related to. So a PM must assign or add a Guest Reporter as a watcher to tickets they need access. Otherwise, the Guest Reporter can create and modify their own issues within the project.

Add Your Custom Roles

Above are examples that we use, but you should add your own custom roles as necessary. Go to the bottom of the list to “Add Project Role” to add your own.

image3

The new role will be added to the list. You will be able to add this role to different “Permission Schemes”. We will explain after our next step to set up “Global Permissions”.

Global Permissions

Global Permissions are configurations for top level users. If you have multiple Atlassian tools, you will be able to configure how different admins can access the different tools. Global Permissions apply to all projects, so you will most likely only add admin groups or users in this area.

image9

To add your new Project Roles to different permissions schemes, select the “Permission Schemes” in the description or click the “Permission Schemes” on the left menu panel.

image8

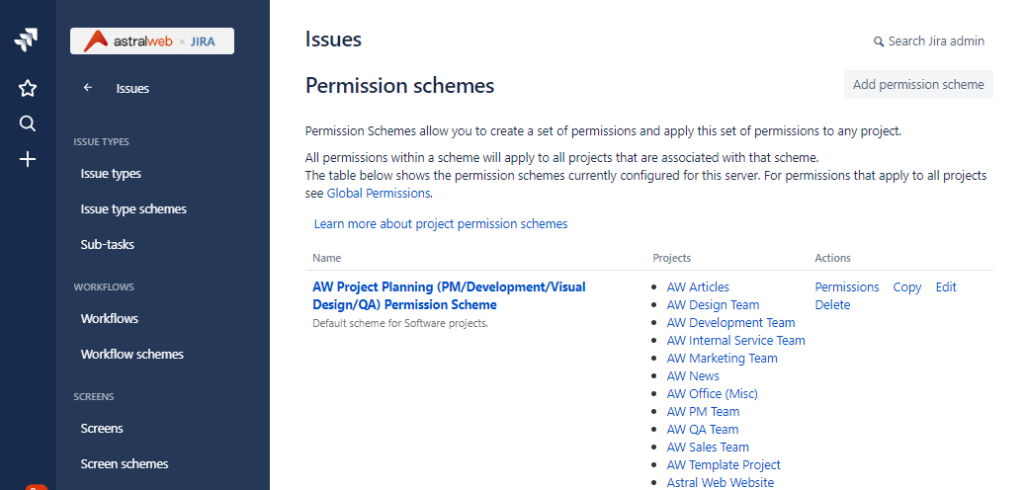
We created a new permission scheme that we apply to all of our projects that we create called “AW Project Planning”. You can do this by selecting the “Add permission scheme” button on the top right.

image1

After you create a new scheme, it will be listed on the permissions schemes list page. Select “Permissions” under the actions column to change configurations.

image6

Inside the scheme, you will see a list of actions and options for Projects, Issues, Comments, and more. You can assign different roles to each of these actions. Once a role has been assigned to an action, then the user within that role for each project will be able to access the feature. For example, we add PMs to the “Administer Projects” permission so they can make high-level changes to projects. We do not add other roles. Other general roles are added to the “Browse Project” permission.

In this way, we continue to add our roles to permissions so we can balance security, efficiency, and necessity for all of our teams and projects.

Next we’ll show you how to change your JIRA interface appearances.

Next: 10 Getting Started with JIRA: User Interface

08 Getting Started with JIRA: Manage Your User Profile

This article is a part of Astral Web’s Comprehensive Guide to JIRA!

image6

Previously: 07 Getting Started with JIRA: Start From Your Free Trial

Manage Users

The first thing you should set up are the users, starting with yourself, that will be accessing your JIRA Cloud. As a JIRA administrator, you will be able to add, remove, and edit any user. For each user, you will be able to assign different groups, project roles, and applications. Your Atlassian site uses single sign on for all your applications so your members don’t have to different accounts if you have multiple applications such as Confluence.

Add Admins

Add your administrators (or just yourself for now is ok) so we can work on JIRA setup together. Go to “JIRA Settings” from the dashboard and select “Users”  under User Management. Type in your administrator emails and select “Jira Software” so they have access to JIRA when they finish registration. Your other applications will show here, so you can select them as necessary if you would like.

image5

Organize Groups

If you’re a small team, you may be okay with less organization, but setting customized permissions for different types of member is good for management and security. There are several default system administration groups. You should be in the highest “site-admins” and “administrators” to have access to these backend setting options. Don’t change access details of these groups since you may lose access to key features. If you need custom access, start adding new groups and add new users to the custom groups.

image7

We customize our users into groups that relate to our internal departments. Project Managers have access to most projects and permission to modify project contents so they have their own group. Designers have access to the design team board and general access to most projects. Engineers are assigned to their responsible projects by project managers. By hiding options that are not relevant to each user, security improves and helps each member focus on what they need to do most. You do not need to create a group for each project, since each project will have user settings that is much quicker to manage. You will be able to add whole groups and adjust permissions per group or individual for each project.

Customize Roles

To customize the access permissions by role, go to “Project Roles” under “JIRA Settings” > “Security”. The highest role a user could be assigned is an “administrator” that grants  permission to edit and delete a project. Lowest is “View only”, which only allows a user to see issues related to them and cannot modify those issues. We added a few extra roles that are easy to change by project managers. Most are for internal members, but we also have external guest roles prevents external users from accessing too much options or information of our projects.

image8

Update Individual Profiles

Each user can update their user profile under “Your profile” menu from the bottom left of the JIRA dashboard screen. Adding a profile image is highly recommended when you have a large team so it is easier to identify each other on thumbnails and name searching.

image4

You can also change settings of JIRA per person under “Personal settings”. We have English and Chinese speakers, so here they can individually set their preferred language setting when they use JIRA. You can also translate workflows and statuses in the backend so all of your documentations are optimized for different languages. Each user can also have their own time zone, if they work remotely or in a different area from your main team.

image2

Maintain Users

We review our member list each month to make sure only active users are registered. We have many projects and guests accounts, so we are careful to communicate with each project manager to understand who needs access. We try to stay in our 50 user subscription limit to control our budget for JIRA.

If a user needs your help or you need to see how a dashboard looks like on a different user’s account you can login as another user under the User Management section. A “Log in as user” option is available under each user. However, you will not be able to log in as another admin. This is one reason you should not add all your members as an admin, since there will be situations you need to help administrate other users.

image3

Next, we will help you go through some general settings of JIRA Cloud so your users can add and manage new projects.

Next: 09 Getting Started with JIRA: User Roles & Permissions

Structured Data JSON/LD for “Parent – Child” Locations

Parent Child Local Business Heirarchy JSON Structured Data

With Google and others increasingly serving information in new formats on both mobile and desktop search engines (e.g. product, service or company “cards”), maintaining accurate and up-to-date structured data is a must as an SEO best practice.

Many businesses fit neatly into one of the organization types provided by Schema.org, but we encountered a case of a business that’s dependent on both local and national SEO results (but not large enough to completely separate corporate and retail). For this reason, we wanted to maintain a parent Organization for organic searches while still marking up individual locations data to improve their local SEO. It was important to us to maintain an explicit relationship between locations and the company as a larger entity.

We settled on creating a parentOrganization > LocalBusiness hierarchy, allowing us to define information for the larger organization & homepage while optimizing location pages. Below is an example of the JSON-LD script that we used for both the parent organization and the local listings.

Other situations where this could be useful include:

  • Defining Headquarters / Corporate Offices and service locations
  • Websites that do business both online and in brick and mortar locations

Homepage:

The script below is pared down to basic information and defines the umbrella business information:

<script type="application/ld+json">{
    "@context": "http://schema.org",
    "@type": "Organization",
    "name": "Your Parent Company Name",
    "logo": "https://yourParentCompany.com/LOGO.png",
    "url": "https://yourParentCompany.com",
    "sameAs": [
        "https://www.facebook.com/yourParentCompany/",      “https://www.twitter.com/yourParentCompany/”
    ],
    "contactPoint": {
        "@type": "ContactPoint",
        "telephone": "+1-800-111-1111",
        "contactType": "Sales",
        "email": "[email protected]",
        "contactOption": "TollFree",
        "areaServed": "United States",
        "availableLanguage": "English"
    },
    "address": {
        "@type": "PostalAddress",
        "addressCountry": "United States",
        "addressLocality": "Los Angeles",
        "addressRegion": "CA",
        "postalCode": "90230",
        "streetAddress": "1025 mainOffice Street"
    }
}</script>

Location Pages:

The goal here is to markup location data, without abandoning the “parent” organization, done so by creating each location as a LocalBusiness subtype of the parentOrgnanization.

<script type="application/ld+json">
{
  "@context": "http://schema.org",
  "@type": "LocalBusiness",
  "@id": "https://yourParentCompany.com/location-1/",
  "name": "Your Company Name - Location Number 1",
  "description": "Your Company Location Number 1, Providing the best goods and or services to the area since mid-March of 1699 BC.",
  "image": [
 "https://yourParentCompany.com/LOGO.png"
  ],
  "areaServed": "serviceArea",
  "url": "https://yourParentCompany.com",
  "telephone": "+1-650-801-3333",
  "address": {
    "@type": "PostalAddress",
    "streetAddress": "123 localBusiness Street",
    "addressLocality": "San Francisco",
    "addressRegion": "CA",
    "postalCode": "94117",
    "addressCountry": "US"
  },
    "parentOrganization": {
    "@type": "Organization",
    "@id": "https://yourParentCompany.com",
    "name": "Your Parent Company Name",
    "description": "Your Parent Company Name: Providing local and international services since Mid January of 1699 BC.",
    "image": [
      "https://yourParentCompany.com/LOGO.png"
    ],
    "url": "https://yourParentCompany.com/",
    "telephone": "+1-800-111-1111"
  }
}
</script>

Needless to say, the above code is just a starting point for creating JSON-LD markup for businesses with similar needs. For example, one of our key goals was to display each locations’ reviews on SERPs, and if you’re adding or updating your structured data this is a great time to add any such data to the localbusiness JSON.

Once you’ve added the data, make sure to confirm that Google’s seeing the right values with their testing tool.

Have other ideas, improvements, questions? Let us know!