This article is a part of Astral Web’s Comprehensive Guide to JIRA!

Previously: 11 Getting Started with JIRA: Issue Management with Basic Agile Workflow
How To Manage JIRA Issues
Editing and assigning issues are good features, but now it’s time to understand best practices on how to manage all of your issues in JIRA.
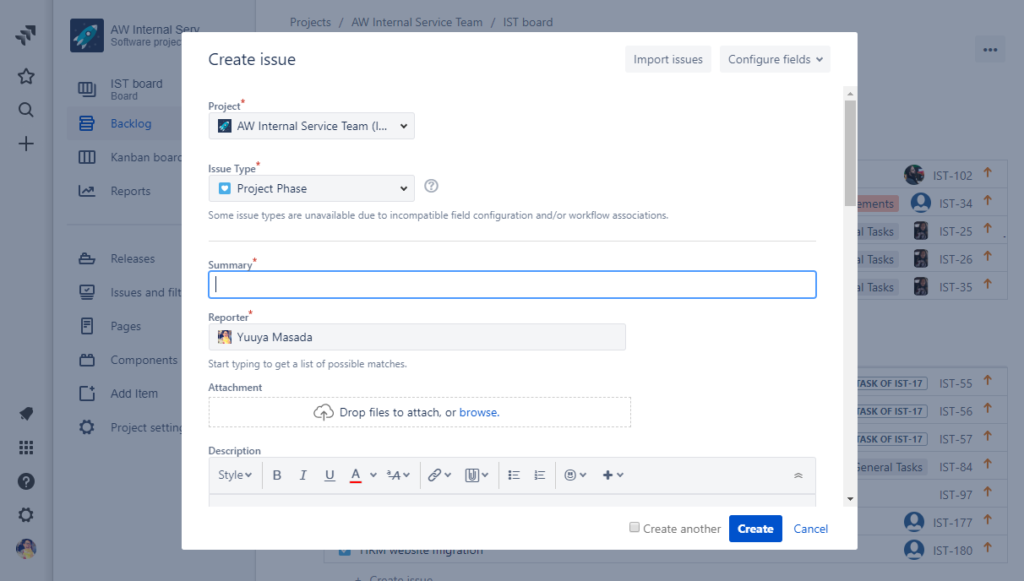
In general, we will look at two types of users who will be using issues: Managers (those who are responsible of assigning tasks) and General Users (those who are responsible for doing the tasks).
Managers need to schedule, customize, and inter-relate all existing issues to successfully achieve project goals. Sometimes, they will need to bulk change multiple counts of issues and maybe even change security permissions on individual issues if non-employee users need access.
General Users will need features such as attaching files and images (such as screenshots), commenting, logging work progress, and get notifications on issues they need to follow.
Below we showcase all the options that are available on each JIRA issue.
Useful Features For Managers
Here are useful features for manager level users on JIRA. Make sure your permissions (described in other sections of our series) are set if or if you don’t want managers to have access to these features.
Scheduling an Issue
The default method to add a schedule to an issue is using the “Due date” field. This field uses a date field so, you’ll easily be able to save dates. You will be able to use this date field to show on dashboard widgets or export to calendar data.

However, Astral Web uses external gantt charts (GanttPro) so we configure custom fields called “Start Date (GanttPro Start Date)” and “End Date (GanttPro End Date)”. We then disable the default “Due date” field so all of our staff use the same fields to schedule tasks (whether they sync to the external GanttPro tool or not).

In this way, all members can track their issues by due date on their dashboard calendar, while managers can continue to use GanttPro using same end/due dates.

Adding a field to an issue
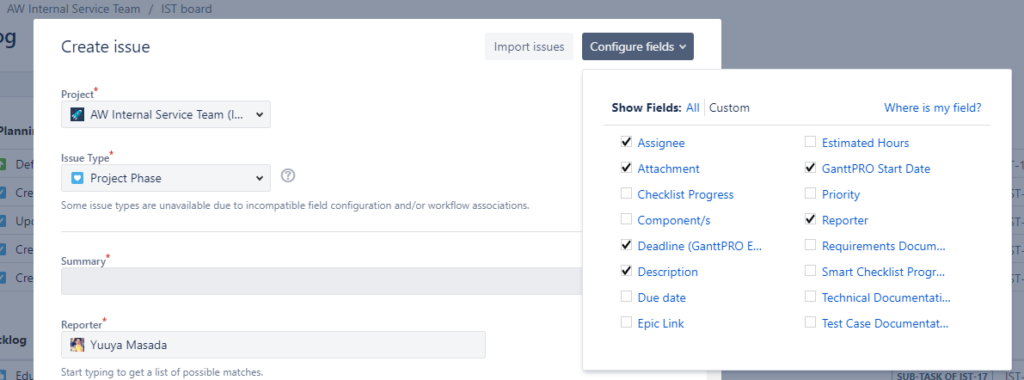
By default, some fields may not be showing on the screen you want to fill details. The available fields vary by different screens: Create Issue screen, Edit Issue Screen (both sidebar and full screen), and others. On the Create issue screen, you can select “Configure fields” to see which fields are active and others that can be added. You will need to have management permission to access this feature, but most manager and general user level should be able to see. If it is not visible, talk to your administrator.
Creating issues using the CSV importer
While creating issues directly on JIRA is convenient, sometimes you may have a whole WBS (work breakdown structure) document that you want to import. You will need to organize your template to make sure that all attribute headers and values match your project settings, but once this has been done, it’ll be so much easier when you want to add dozens or hundreds of tasks at once.
In our case, we know we have custom fields that we sync with external tools, so we make sure those fields are covered in our template. We even have a master projects template that holds about 150 tasks that helps kick-start our managers to make progress on their projects.
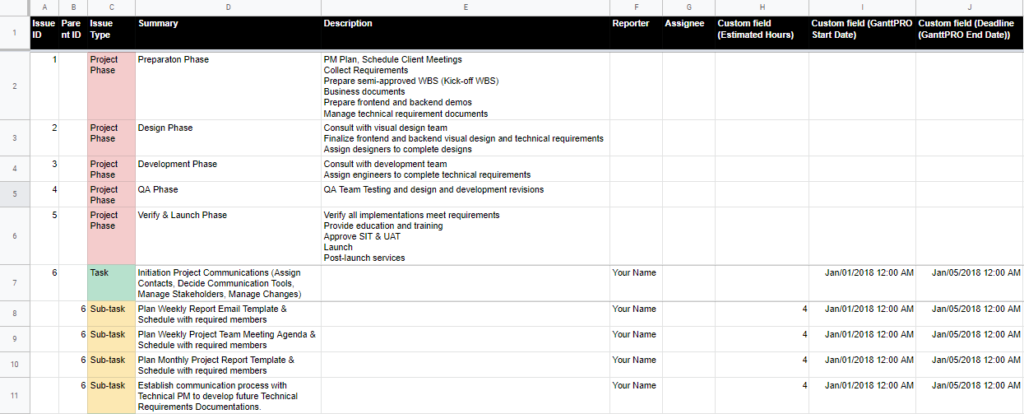
To bulk import your tasks, make sure your document is converted into a .csv file. (In Google Docs, you can export using File > Download as > Comma-separated values.) Then, you have to options to access the import page.
One is the “Import issues” button from the “Create issue” screen.

Or, from Admin > System > Import and Export > External System Import.
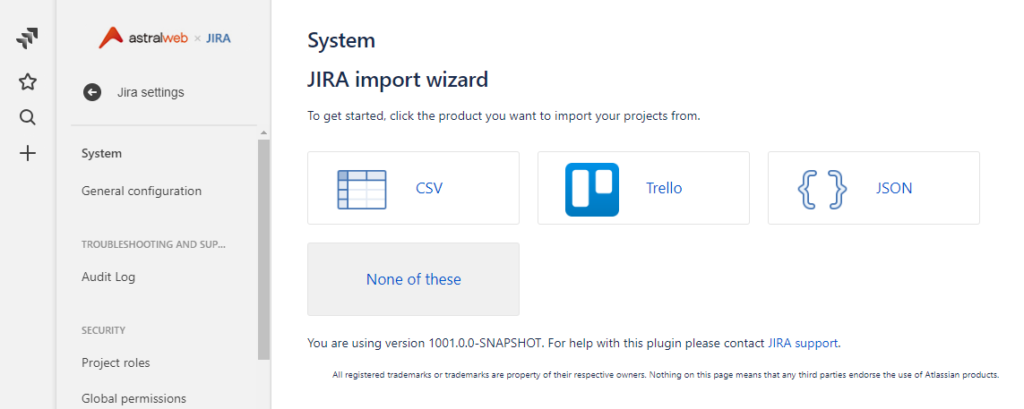
Then, you will be at the import csv page where you can select your .csv source file.

If you import often, then creating a configuration file that helps you assign issues to projects and map all data values to the right headers. You can get this at the end of the import, if you would like.

Select “Next” button.
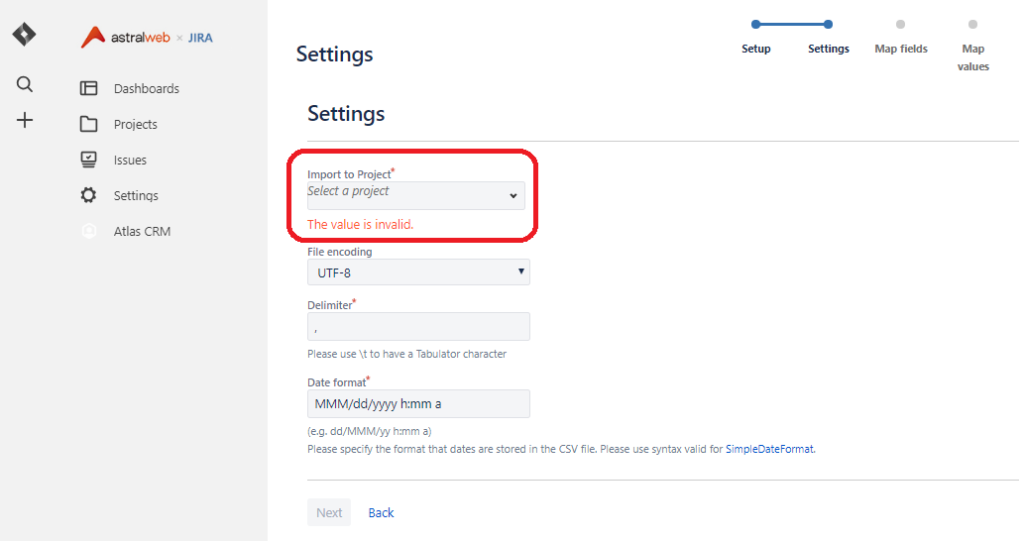
Select your project that you have created under “Import to Project” dropdown.
Select “Next” button.
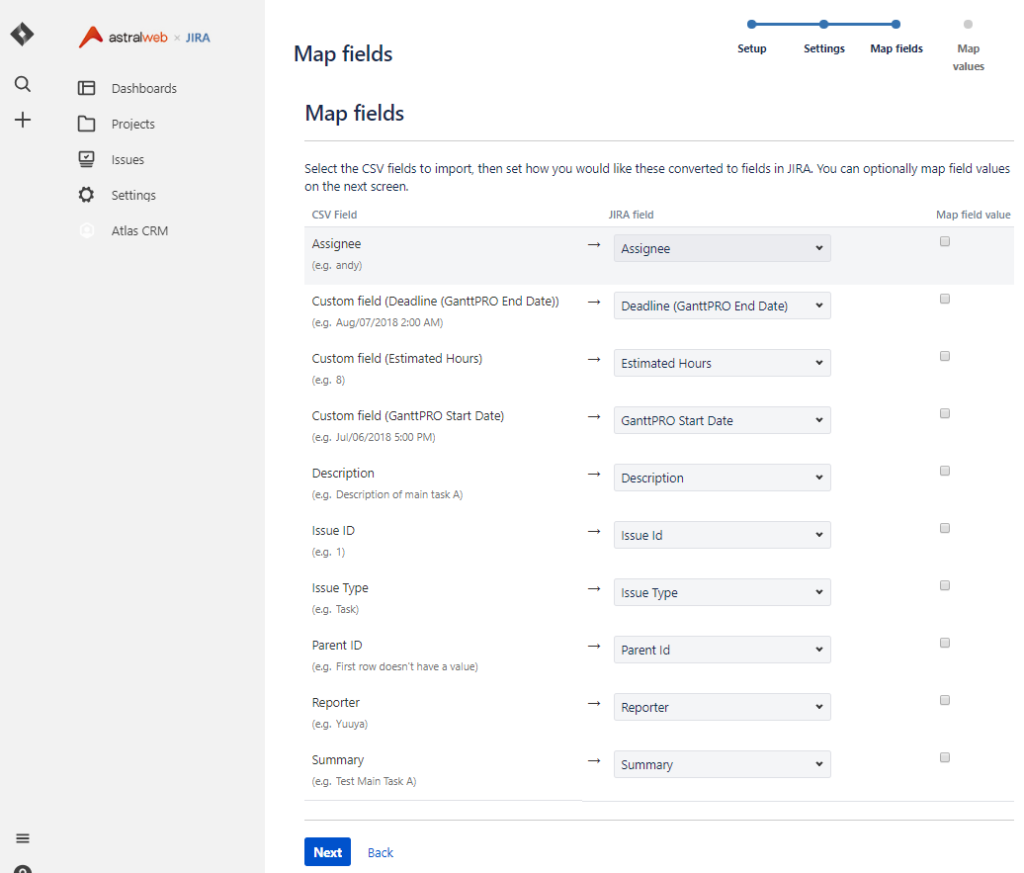
All fields should automatically be assigned. If there is no issue select “Next” button.

To make sure your data is good, press “Validate” button. This process may take a few minutes.
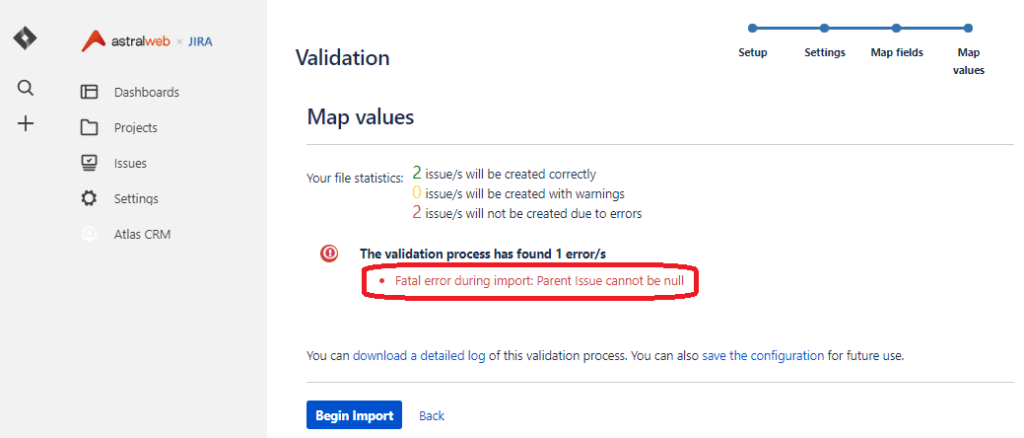
If you have more than one error, please fix your CSV file.
If you only get one error “Fatal error during import: Parent Issue cannot be null” you are ok. This is because the validator does not know that Sub-Tasks cannot have a unique ID.
You can proceed to select “Begin Import”.

Confirm that the count of issues are the same as what you have prepared in your CSV, and your import is all set.
Creating a Sub-Task
Sub-tasks are useful when a large issue needs to be split into smaller tasks, such as when you need to assign different people or multiple deadlines are required.
If you are on a full-page issue, then you will click on the “Create subtask” icon.

You will be able to quickly add sub-tasks that are under the current parent issue.

After you add a sub-task, you will be able to edit and manage the sub-task like any other issue. In the breadcrumbs, you will easily notice that a task is under another parent issue. This feature of of many that is helpful for managers to organize different levels of tasks. You may also find other features such as Epics, Versions, and Components useful when creating task relationships. (Details in our topics!)

Linking Issues
Using sub-tasks is limited 2 levels, so you will not be able to assign many issues under another. Instead, you can use issue linking. Linking issues are useful or tasks such as bugs, so you know that a bug is related to a specific issue.
On the full-screen issue page, you can select the “Link issue” button to show the Linked issues block. You will be able to easily search issues to link. You can also define the type of relationship such as “is blocked by”, “blocks”, “has to be done after”, “related to”, and more. These are not only labels, but actually function as they are read. So, if you define an issue to be done before or after another specific issue and you try to close an issue wrongly, JIRA will notify you that something goes wrong.

Modifying Multiple (Bulk) Issues
As a manager, modifying multiple issues at once is a life saver. Even something simple as closing issues at once, or re-assigning a bulk of issues to another person or project, these can be done quite easily.
In your project, go to your Issues and filters tab.

You can use the simple search, or click “Advanced search” for better results.
For example, I want to re-assign everything assigned to a specific person to another person. I will use JIRA Query language to filter down the issues to the project and assignee. (Please search JQL for more details on how to query.)
Next, select the “…” menu on the top right.

Because the query creates a specific list, you are able to use this list to make bulk changes. So, next, select “Bulk change all ** issues(s)”.

You will be able to further refine your list, or select the top check box to select all. Select “Next” on the bottom of the page.

You will be able to edit issues (field values in issues), move issues (from one project to another), transition issues (change status), delete issues (permanently remove from JIRA), watch issues (assign who gets notifications to the issues), or stop watching issues.
Select Edit issues to make issue changes.

You will be able to change multiple values at once, but here we will re-assign all the issues to someone else. Make sure you select the checkbox and choose the new assignee.
Select “Next” at the bottom of the page to confirm. (You can also choose to get an email log of the operation by selecting the checkbox .)
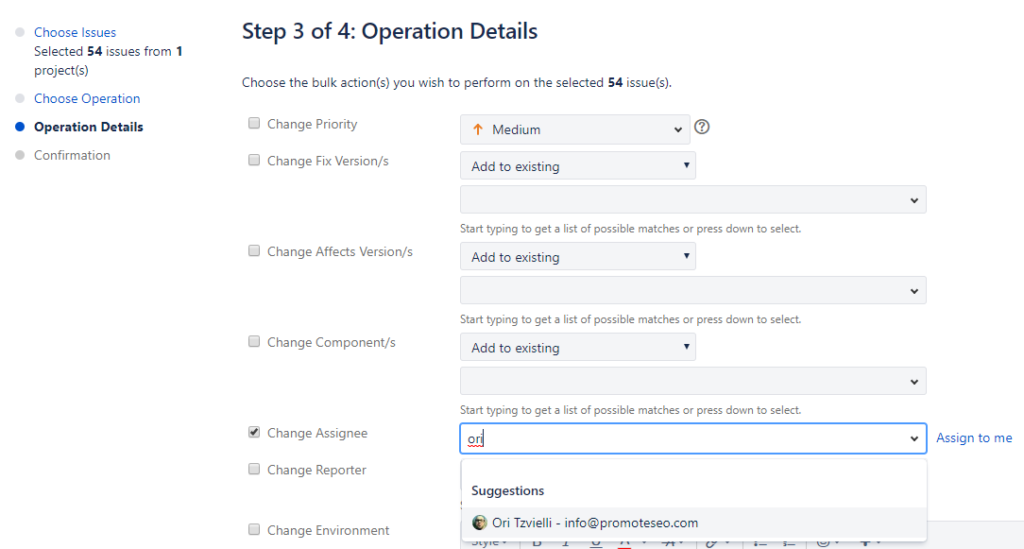
Once you press confirm, your editing will complete.
Useful Features For General Users
General Users features are the most commonly used features that all team members will need to use, unless you are a guest user that can only view issues.
Attaching a File
You can attach files by dragging in documents or files directly into the issue description or into comments. They will automatically be listed in the “Attachments” section of the issue.

To delete an attachment, selec the “X” icon on a file under the Attachments section.

Attaching a Screenshot
Attaching a screenshot is also easy. This applies to any copied image. After you copy an image or take a screenshot capture, select Ctrl+V to paste the image into the issue description or comment. Your image will be saved automatically as an attachment.

Cloning an Issue
In a case you want to duplicate or clone an issue, you can go to the “…” menu on the top right and select clone. JIRA will create the same issue on a new issue ID number for you.

Commenting on an Issue
Any user with the permission can comment on an issue. Go to the bottom Activity section on an issue to add a comment.

Editing Rich-Text Fields
Comments are one example, but you will be able to style your content in Rich-Text Fields.
You can bold and italicize text, add bullets, images, and even block text in quote or code format.

Watching and Voting on an Issue
If you are a reporter or assignee, you will be a watcher and get notifications as how you have set in your admin settings. However, in case you want to watch or have other members to follow an issue, go to the top of the issue and select the “Watch options” icon. You will be able to add users to watch and get notifications.

Logging Work on an Issue
Work log is useful for tracking how much time has been spent on a specific issue. In the Activity section, switch the view to Work log to view all work that has been logged to the issue.

To add a new work log, go to the top of the issue and under “…” menu select “Log Time”.

In the popup you can log the amount of time and the description of the work that has been done. The feature relates to the “Estimate Time” of the task a manager has assigned, so members do not under or over report work done on tasks.

We hope that gives you greater insight on what JIRA issues are capable of! Stay tuned for more in our upcoming articles.
Next: Coming Soon


